
Sump Pump Pit Replacement Minnesota: A Proper Basin
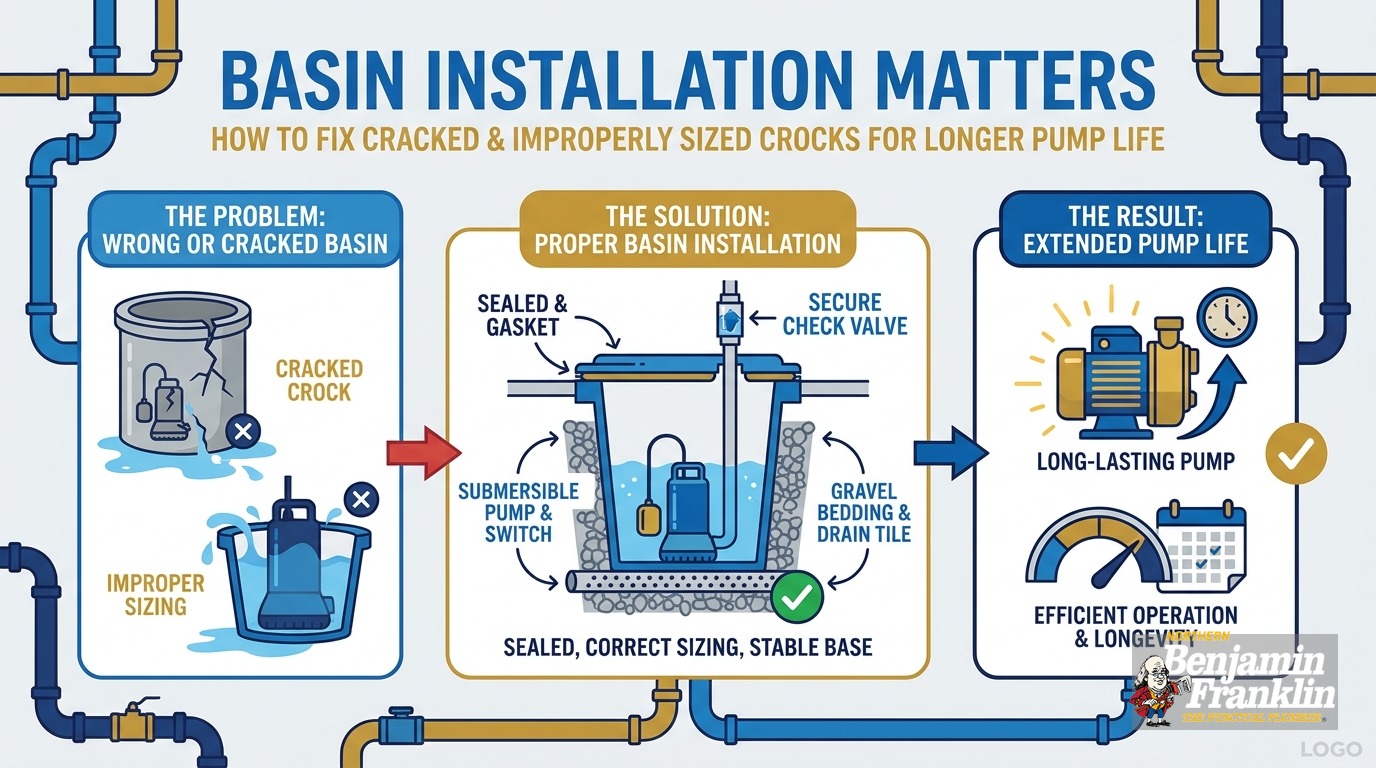
Key Takeaways
- A sump pump is only as good as the pit it sits in. A cracked, shallow, or undersized crock shortens pump life.
- One pump maker’s manual calls for a basin at least 18 inches across and 24 inches deep. Treat that as manufacturer guidance, not a Minnesota rule.
- The pump needs a firm base, not bare clay, earth, gravel, or sand.
- A gasketed lid and a check valve are part of a proper install, not extras.
- Groundwater sumps and sewage sumps follow different rules. Do not mix them up.
- Pit replacement is a bigger job than a pump swap. Call (763) 296-1844 for a real quote and a firm arrival window.
Why Does the Pit Matter as Much as the Pump?
The pit, also called the basin or crock, holds the water the pump removes. If it is cracked, too small, or poorly set up, the pump works harder, cycles more often, and fails sooner. A new pump in a bad pit often repeats the same failure.
Most homeowners focus on the pump. That makes sense, since the pump is the part that hums, floats, and moves water.
But the pump sits in a hole in your basement floor, and that hole shapes how the pump behaves every time it runs.
A narrow pit can crowd the float switch. A shallow pit can leave the pump half exposed. A pit with cracked walls can let soil, silt, and gravel into the water.
Each problem adds wear. Over a few seasons, that wear can kill a pump, often during the storm you needed it for.
We are a locally owned and operated plumbing company serving the Twin Cities, and we see this pattern often. A homeowner replaces the pump twice in a few years. The real problem was the pit all along.
How Do You Know the Crock Has Cracked?
Look for visible cracks in the basin walls, soil or silt collecting in the bottom, water seeping in around the rim, or a pit that has shifted. Some cracks hide below the waterline, so a plumber’s inspection is the surest check.
Many crocks are plastic or fiberglass. Older ones may be clay tile or concrete. Each type fails in its own way.
Signs the pit itself may be the problem:
- Visible cracks or splits in the wall, especially near the top
- Gritty silt or small stones in the bottom of the pit
- The pit wall bowing inward or leaning
- Water seeping around the rim of the basin
- A pit that looks rusty or stained far above the water level
- A pump that sits crooked or tips against the wall
- A float that snags on the pit wall
Some of these are easy to spot. Others are not.
Shine a flashlight into the pit with the pump off and the power safe. Check the walls, the bottom, and how the pump sits.
Do not reach into the pit while the pump is plugged in. Unplug it first. Water and electricity do not mix.
Grit in the bottom has to come from somewhere. Soil may be entering through a crack or a failed joint. That grit can jam the float and wear the impeller, the spinning part that moves the water.
If you are unsure what you are seeing, we can look at it with you. Our sump pump services include inspection, repair, and replacement.
What Size Should a Sump Pump Basin Be?
One pump manufacturer’s installation manual says the basin diameter should be at least 18 inches and the depth at least 24 inches. That is one maker’s requirement, not a Minnesota rule. Other makers set different minimums, so check the manual for your specific pump.
The pump installation manual says the basin should be large enough to fit the pump and let the float switch move freely.
That is a useful starting point, not a universal law.
We found no Minnesota rule that sets basin dimensions for a basement groundwater sump. Basin size comes from the pump maker, the pump type, and good practice.
Other manufacturers scale the minimum diameter with the pump’s capacity. A larger pump needs more room. Some also set their own depth minimums.
So what should you do?
- Read the manual for your pump. It lists the minimum basin size.
- Match the basin to the pump, not the other way around.
- Leave room for the float to swing freely without touching the wall.
- Leave room for the pump to sit level on a solid base.
Many older homes in Minneapolis and St. Paul have small, shallow pits. Builders often set them at the minimum, or below it. A pit that suited a small pump decades ago can be wrong for a modern one.
A narrow pit causes real trouble. The float can bind against the wall. The pump may not turn on when it should, or may not turn off.
When a float sticks, the pump can run dry or fail to run at all. Both are bad.
Does Water Depth in the Pit Affect Pump Life?
It can. One pump maker says a residential sump pit should hold at least 24 inches of water in the bottom to help prevent short cycling, which leads to pump failure. Experts disagree on how much depth matters, so treat it as one factor.
Short cycling means the pump turns on and off in quick bursts. Each start stresses the motor.
The pump maker’s installation article says: “a residential sump pit should have at least 24 inches of water in the bottom of the pit.” It ties that depth to preventing short cycling.
Not every source agrees. Some argue depth matters little, because float switches turn on at fixed levels. Others point to a failed check valve as the cause.
Our view: several things can cause short cycling, and a shallow pit may be one of them.
A small pit holds less water between cycles, so the pump fills and empties it quickly. More cycles mean more starts, and more starts mean more wear.
A larger, deeper pit gives the water more room. The pump runs longer, less often. That is gentler on the motor.
The same article says to “select a basin size that lets the sump pump submerge entirely.” It links air exposure to rust.
That matters in a shallow pit. If the top of the pump sits in the air, it can corrode. A pit sized to the pump keeps it covered.
We are not saying every shallow pit must go. When a pump keeps failing early, check the depth and size.
Why Does the Pump Need a Firm Base?
A pump sitting on soft or loose material can tilt, sink, and pull in debris. The pump manual says not to place the pump directly on clay, earth, gravel, or sand. It suggests a brick or block as a firm, level base.
The same installation manual is clear: “Do not place pump directly on clay, earth, gravel, or sand.” It suggests a brick or block as a firm base.
Why does that matter?
Many pits have a gravel or dirt bottom, especially in older homes. Some have no bottom at all, just a tile ring set into the ground.
When the pump sits on loose material:
- The pump can settle and tilt over time.
- The intake can pull in sand, silt, and small stones.
- The float can end up at the wrong angle.
- The pump can rock when it starts, which adds stress.
Silt is hard on pumps. It wears down the impeller and clogs the intake. It can also build up in the pit and cut into the room the pump has to work.
A sealed, solid bottom helps. So does a firm, flat base for the pump. Together they keep the pump upright and the water cleaner.
When we replace a pit, we set the new basin so the pump sits level and stable. That one step prevents a lot of slow damage.
What Else Belongs in a Proper Basin Installation?
A proper installation includes a right-sized basin, a firm base, a gasketed cover, a check valve, a correctly sized discharge line, and a pump placed so the float moves freely. Each part protects the pump or the home.
Think of the pit as a small system where each part has a job.
A proper installation covers:
- A right-sized basin. It fits the pump and leaves room for the float.
- A firm base. The pump sits level and off the loose bottom.
- A gasketed cover. It keeps debris out of the pit.
- A check valve. It stops water from flowing back down the pipe.
- A sound discharge line. It carries water away from the home.
- A weep hole, if required. It helps keep the pump from air locking.
Three of these get overlooked most often.
The gasketed lid
An open pit collects things. Dust, tools, kids’ toys, and spiders all end up in there. A lid prevents that.
The manual says to “Install a basin cover and gasket to prevent debris from falling into the basin.” You can read that on the installation manual page.
Debris can jam a float or clog the intake. A sealed lid also helps contain moisture and odors in a finished basement.
The check valve
When the pump shuts off, water in the discharge pipe wants to fall back down. A check valve is a one-way door that stops it.
The same manual says: “Install a check valve (required) to prevent back-flow.”
Without one, the water runs back into the pit and the pump turns on again to push out the same water. That is wasted work, and it can add to short cycling.
A check valve also shields your pump from the pressure of that falling water. It is a small part with a big job.
The weep hole
A weep hole is a tiny hole in the discharge pipe. It releases trapped air so the pump does not lose its grip on the water.
The manual says a 1/8-inch weep hole, if required, goes in the discharge pipe 1 inch above the pump discharge. Not every pump needs one. Follow the manual for your model.
Details like this matter. A weep hole in the wrong spot, or a missing one, can cause trouble. A trained plumber knows where it belongs.
To learn how long pumps usually last and when to swap them, read our guide on sump pump lifespan and when to replace.
Do Sump Pump Rules and Sewage Pit Rules Differ?
Yes. Minnesota’s plumbing code sets detailed rules for sewage and grinder sumps, such as bolted, gasketed covers and vent sizes. Those rules apply to sewage systems, not to a basement groundwater sump. Do not assume they cover your pit.
Online sources often blur the two.
Minnesota’s rule on sewage and grinder sumps is written for systems that handle waste. It requires “substantial covers having a bolt-and-gasket-type manhole or equivalent opening.”
Vents must be at least 1-1/2 inches in diameter. Discharge piping must be at least 1 1/4 inches, with a check valve and a full-way shutoff valve.
The rule also says the basin volume and pump capacity must “at a minimum accommodate water demand peak flow from all fixtures.”
Those requirements make sense for a sewage pit, since waste water is a different hazard from groundwater.
The rule does not apply to a basement groundwater sump. We mention it only as a comparison. It shows how seriously the code treats sealed covers and check valves where sewage is involved.
If your home has a pit that handles bathroom waste, that is a different system, such as an ejector pit for a basement bathroom. Our post on basement bathroom ejector pumps in Minnesota explains how those work.
Do not treat a sewage pit like a groundwater pit, or the reverse. They need different parts and different care.
What about permits and local rules? Cities can set their own requirements. We did not find official city pages confirming specific permit rules for sump work, so we will not guess. Ask your city, or ask us. We handle the details on the jobs we do.
How Does Minnesota Frost Affect the Discharge Line?
Frost can freeze water inside the outdoor end of the discharge line and block it. State code sets frost depth for footings at 3-1/2 feet in Zone II, which includes the metro counties. That figure shows how deep winter cold reaches.
The water has to go somewhere, so the discharge line matters as much as the pit.
In winter, the outdoor end of the line can freeze. A blocked line can back water up into the pit.
Minnesota’s footing depth rule sets frost depth at “five feet in Zone I and 3-1/2 feet in Zone II.” Hennepin, Ramsey, Anoka, Dakota, Washington, Scott, and Carver counties are all in Zone II.
That rule covers footings, not sump discharge lines. We cite it to show how deep frost can reach in the Twin Cities. Exposed pipe near the surface has far less cover than a footing.
A frozen line is a real risk for any pump. If the water cannot leave, the pump runs against a blockage and the motor strains.
A new pit is a good time to look at the whole path. Where does the line exit? Does it slope away from the home? Is any part exposed to hard freezes?
Our guide on sump pump discharge lines freezing in Minnesota covers this in detail.
What Happens During a Sump Pump Pit Replacement?
A plumber removes the old pump, breaks out the floor around the pit, digs out the old basin, sets a new right-sized one, and restores the floor. Then the pump, check valve, and discharge line are reconnected and tested.
Pit replacement is more involved than a pump swap, because it touches your basement floor.
The job usually looks like this:
- Inspect. We look at the old pit, the pump, the check valve, and the discharge path.
- Prepare. We protect the area and shut off power to the pump.
- Open the floor. We cut and remove concrete around the old basin.
- Remove the old crock. We dig it out and clear the hole.
- Set the new basin. We place it level, at the right depth, and sized for the pump.
- Build a firm base. The pump will sit on a solid, level surface.
- Restore the floor. We patch the concrete around the new basin.
- Install the pump and fittings. That includes the check valve and the discharge connection.
- Add the lid. A gasketed cover goes on to keep debris out.
- Test. We run water through the system and watch a full cycle.
The patched concrete needs time to cure. Your plumber will tell you how long to wait before you rely on the pit.
Timing matters. If you can help it, do not schedule pit work right before a heavy storm. Spring runoff is the busiest time for sump pumps in the Twin Cities. Fall is often a calmer window.
Our post on spring runoff and your basement explains why April tests every pit.
Pit replacement can be a larger job. Ask us about financing options when you call.
When Should You Replace the Pit Instead of Just the Pump?
Replace the pit when it is cracked, leaking, shifted, too small for the pump, or full of silt. Replace only the pump if the basin is sound, correctly sized, and clean. A plumber can check both in one visit.
Not every failing pump means a bad pit. Sometimes the pump just wore out.
Here is a simple way to sort it out.
Replace only the pump if:
- The basin is intact with no cracks or leaks
- The pit fits the new pump’s size needs
- The bottom is clean, without silt or grit
- The old pump simply reached the end of its life
Replace the pit too if:
- The wall is cracked or the rim is damaged
- The pit is smaller than the new pump’s manual calls for
- The pit has a dirt or gravel bottom with no firm base
- Silt keeps fouling your pumps
- The pump has failed early more than once
- There is no workable lid or the lid does not seal
If you have replaced a pump twice in a short time, look at the pit. Repeating the same fix rarely changes the result.
Think about backup protection too. A well-sized pit can hold a primary pump and a backup. Our guide on sump pump battery backups for Minnesota storms explains why power loss during storms is a real risk.
A good pit leaves you room to add that safety later.
Can You Replace a Sump Pit Yourself?
You can, but it is hard work. It means breaking concrete, digging, leveling, and patching, then wiring and plumbing the pump correctly. Mistakes show up as flooded basements. Most homeowners are better served by a licensed plumber.
Some handy homeowners take on small plumbing jobs. A pit replacement is a bigger step.
You would need to:
- Cut and break the basement slab
- Dig out the old basin and haul away debris
- Set the new basin level at the right depth
- Create a firm base and seal the bottom
- Reconnect the discharge line with a check valve
- Patch the concrete so it cures properly
Each step has risks. A crooked basin can bind the float. A missed check valve can cause short cycling. A weak patch can crack.
Timing is a risk too. If your sump fails while the floor is open, water has nowhere to go. A plumber can plan the work and have the right parts on hand.
For a smaller project, start with a check-up. Our post on a sump pump check-up to keep your basement dry walks through what you can safely look at yourself.
What Makes Northern Benjamin Franklin Plumbing Different?
We are locally owned and operated and serve Twin Cities homeowners. We back our arrival windows with the On-Time Guarantee(R): arrive in your window or we pay you $5 for every minute we are late, up to $300.
You do not want to wait on a pit replacement. Water does not wait.
We built our service around showing up when we say we will. With our On-Time Guarantee(R), you pick a window and we arrive in it. If we do not, we pay you $5 for every minute we are late, up to $300.
Our promise is simple: “If there is any delay, it’s you we pay!”
We are a local team, and we know Minnesota basements. That includes the older homes in Minneapolis and St. Paul, the newer builds in Maple Grove and Blaine, and the clay soil and spring runoff that test every sump pit.
We also back our work with a 100% satisfaction guarantee.
We do plumbing only. That includes sump pumps, drains, sewers, water heaters, and water treatment. We do not do heating, cooling, or electrical work.
Call Us Before the Next Storm
A cracked or undersized crock is easy to ignore. It sits in the corner, out of sight. The pump keeps running, until it does not.
If your pump keeps failing, your pit is cracked, or you are not sure the basin fits the pump, let us take a look. We will check the basin, the base, the lid, the check valve, and the discharge path. Then we will tell you plainly what needs doing.
Call (763) 296-1844 or book online. We will give you a real quote and an arrival window we stand behind.
Frequently Asked Questions
How big should a sump pump basin be? +
Can a cracked sump pit be repaired? +
Why does a sump pump need a check valve? +
Should a sump pit have a lid? +
Need a technician now?