
How to Replace a P-Trap Under Your Sink (and When Not To)
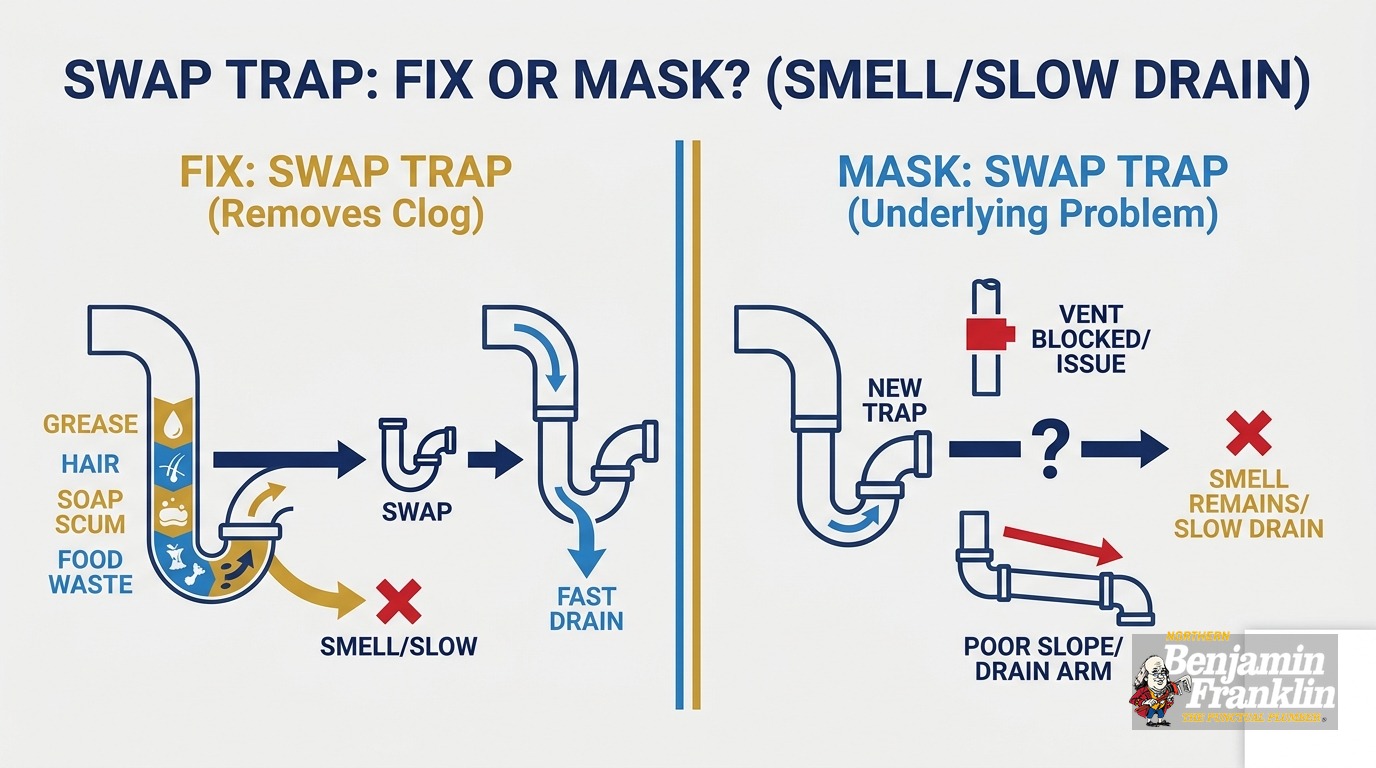
Key Takeaways
- A P-trap holds a small water seal that physically blocks sewer gas from entering your home. When that seal is gone, the gas comes in.
- Before replacing the trap, run the three-question triage below. Odor and slow draining are symptoms that can come from a dry seal, a venting problem, a drain arm sloped the wrong direction, or an S-trap that siphons itself empty by design.
- Gurgling from a nearby drain when the toilet flushes is a venting signal. A new trap will not fix a venting problem.
- A drain arm pitched back toward the sink re-empties the trap seal after every use. New trap parts do not correct the slope.
- S-traps are common in pre-1960 Minneapolis and St. Paul homes. They are prohibited under Minnesota plumbing code because they siphon themselves dry. Replacing the plastic parts on an S-trap still leaves you with an S-trap.
- A straight trap swap is homeowner-friendly work under Minnesota law. Any change to drain arm routing or vent connections requires a permit.
- If the smell returns within 24 hours of installing a new trap, the problem is elsewhere in the drain-waste-vent system.
The Swap Is Easy. The Diagnosis Is What Matters.
Replacing a P-trap is one of the more approachable plumbing repairs a homeowner can do. The tools are basic, the parts cost a few dollars, and the assembly takes most people under an hour with no prior plumbing experience.
The problem is that a P-trap swap is the right fix for one cause of sewer odor and slow draining. It is not the right fix for three others. Most online guides start at “buy the parts.” This one starts earlier, because the most common outcome of a P-trap replacement that fails to fix the problem is that the homeowner bought the right part for the wrong cause.
Spend two minutes on the triage questions below before you touch anything. If the trap is genuinely the issue, the full swap walkthrough follows. If the triage points somewhere else, you’ll know before you’ve taken anything apart or spent a dollar.
What Is the Purpose of a P-Trap Underneath the Sink?
The short answer: A P-trap holds a small reservoir of water in its curved section at all times. That water is a physical seal between the air in your home and the sewer gas in the drain line. When the seal is full, sewer gas cannot pass it. When the seal is empty, nothing blocks the gas.
The gas that moves through an empty trap contains hydrogen sulfide (H2S), which your nose can detect at concentrations as low as 0.01 parts per million. That detection is useful. It is the rotten egg odor that tells you something is wrong. The danger is that at 100 to 150 ppm, olfactory fatigue sets in and you can no longer smell it. The gas keeps accumulating while you stop noticing. OSHA’s immediately dangerous to life or health threshold for hydrogen sulfide is 100 ppm. An empty trap seal is a health concern, not just a nuisance.
The shape of the trap is not incidental. The curved P geometry positions the lowest point of the trap below the drain arm outlet. Water pools there and stays there between uses. As long as the seal is not evaporating, siphoning, or leaking, that water holds the line.
Three Questions to Ask Before You Replace Anything
Does the smell go away after you run water?
Run the sink for thirty seconds. Does the odor clear and stay gone for several hours? If yes, the trap seal dried out from low use - a common situation in a basement sink, a guest bathroom, or a bar sink that runs infrequently. A dry seal is not a broken trap. Running the sink regularly restores it. If you use the drain daily and the smell still clears after running water but returns within a few hours, the trap is not holding the seal and needs to be replaced.
Do nearby drains gurgle when the toilet flushes?
Stand at the sink and flush the toilet. Listen for gurgling or bubbling at the sink drain. That sound is air being pulled through the drain line under negative pressure. It signals that the drain-waste-vent system is not maintaining proper air circulation in the stack. The vent is blocked, undersized, or breached. Minnesota plumbing code (MN Rule 4714.0100) requires the drainage system to provide air circulation “with no danger of siphonage, aspiration, or forcing of trap seals under conditions of ordinary use.” When the vent fails that standard, it siphons trap seals throughout the system. A new trap will be dry again within a day. Our post on gurgling drains and vent problems covers how to diagnose and fix this.
Does water pool briefly before it starts draining?
Watch the basin when you run a full sink of water. Does it sit for a beat before the drain catches up? That pattern points to a drain arm sloped back toward the sink rather than toward the wall. Minnesota plumbing code requires horizontal drain pipes three inches or smaller to slope at least 1/4 inch per foot toward the outlet, a minimum carried over from the Uniform Plumbing Code incorporated into MN Rule 4714. An arm pitched even slightly the wrong direction holds water on the sink side of the trap, which then drains back and empties the seal after each use. A new trap installed on a back-sloped arm will fail the same way the old one did.
Does Your Home Have an S-Trap?
Look under your sink. Does the drain pipe drop straight down into the floor? Or does it exit through the wall?
A drain that exits through the floor is a strong indicator of an S-trap. Minneapolis and St. Paul have a large inventory of pre-1960 homes where S-traps were standard under bathroom sinks before the P-trap-plus-vent requirement took hold. S-traps are now prohibited under Minnesota plumbing code because they siphon themselves dry by design. When water rushes down from the sink outlet and then back up and down again through the S shape, the momentum and weight of the water column pulls the trap seal with it.
Replacing the physical parts of an S-trap with new plastic still leaves you with an S-trap. The geometry is what siphons the seal, not the age or condition of the hardware. Fixing an S-trap means rerouting the drain arm to exit through the wall and adding a proper vent connection. That is regulated plumbing work. If you suspect this is your situation, a plumber can confirm it in minutes and walk you through what the correction involves.
How to Replace a P-Trap Under Your Sink
If the triage above points to the trap itself - it’s leaking at the slip joints, visibly cracked, or the seal won’t hold despite correct slope and no venting symptoms - here is the complete replacement process.
What you need:
- Replacement P-trap kit (1-1/2 inch for kitchen sinks, 1-1/4 inch for most bathroom sinks - measure the tailpiece diameter before shopping)
- Channel-lock or slip-joint pliers
- A bucket or folded towel positioned under the trap
- A flashlight
Step 1: Clear the cabinet and position a bucket.
The trap holds water. The moment you loosen the first slip-joint nut, that water comes out. A towel works for small amounts. A bucket is more reliable if the drain hasn’t run recently. While the cabinet is empty, note any other supply or drain connections near the trap. If you have an under-sink water appliance or filter, be aware of those connections so you don’t stress them during the swap.
Step 2: Loosen the slip-joint nuts by hand.
Slip-joint nuts are the large threaded rings at each end of the trap. Try them by hand first, counterclockwise. Many will break free without tools on newer plastic assemblies.
If a nut won’t move, use channel-lock pliers on the nut itself, not on the pipe body. Apply steady counterclockwise pressure. Mineral buildup bonds the washer to the fitting over time, especially in the Twin Cities where hard water is the norm. If the nut absolutely refuses to budge and flexing the pipe is a risk, cut the trap out with a hacksaw. The plastic costs a few dollars. A cracked drain stub-out at the wall costs considerably more. For situations where the wall fitting itself is threaded into copper or iron and won’t move, stop and call a plumber. Forcing that connection can snap the pipe inside the wall. For similar challenges with stubborn connections under the sink, the same caution applies to a shutoff valve that refuses to turn.
Step 3: Remove the old trap and inspect the washers.
With both nuts loose, pull the trap free. The drain arm - the horizontal section running toward the wall - usually comes out at the same time. Pull the rubber or plastic washer out of each slip-joint nut. If a washer is compressed flat, deformed, or cracked, replace it. A bad washer is the most common cause of a dripping joint on a newly installed trap.
Step 4: Check the tailpiece length.
The tailpiece is the short vertical pipe that drops from the sink drain flange down to the trap inlet. Minnesota plumbing code limits the tailpiece to a maximum of 24 inches of vertical drop from the fixture outlet to the trap weir. A tailpiece that exceeds that drops water with too much velocity and can pull the seal out on its own. If yours is longer, shorten it before installing the new trap.
Step 5: Assemble and install the new trap.
Slide the slip-joint nuts onto each end of the trap - threads facing outward - before connecting anything. This is the step people skip and then have to disassemble to correct. Seat the trap inlet under the tailpiece and the outlet into the drain arm. Tighten the nuts by hand until snug, then add a quarter-turn with pliers. That is all the torque plastic slip joints need. Overtightening cracks the fitting. Undertightening drips.
Step 6: Set the drain arm slope, then final-tighten.
Before tightening the wall fitting, confirm the drain arm slopes toward the wall. Hold a short level against the arm - the bubble should sit just past center toward the wall end. Get the slope right before final-tightening. Locking the wall fitting first and trying to adjust slope afterward means loosening a connection you just torqued.
Also check the arm length. For a 1-1/2 inch pipe, Minnesota code sets the maximum trap arm length at 3 feet 6 inches - 42 inches - before a vent connection is required. An arm that exceeds this and has no vent will produce a slow drain that no new trap can cure.
Step 7: Run water and check every joint.
Fill the sink and release it all at once. Watch each slip joint while the water is moving. Check again three minutes after the drain quiets. Slow seeps won’t show themselves immediately. Run the sink twice more. If a joint weeps, snug the nut a quarter-turn. If it still drips, disassemble, inspect the washer seat for debris or deformation, and reassemble.
How Do I Install a P-Trap Pipe Correctly?
The short answer: Slide the slip-joint nuts onto each pipe end - threads facing out - before assembling the trap. Seat the trap, tighten hand-tight plus a quarter-turn with pliers, then set the drain arm slope at 1/4 inch per foot toward the wall before final-tightening the wall connection.
The sequence is the part people most often get wrong. Tightening the wall connection before setting the slope locks in whatever pitch the arm took during loose assembly. Snug everything loosely first, set the slope with a level, then final-tighten from the wall fitting toward the tailpiece. This matters on a first install and on any replacement where you are also adjusting where the drain arm sits.
What Happens If a P-Trap Is Installed Backwards?
The short answer: A reversed trap has no low point to collect water, so no seal forms. Sewer gas passes through it continuously and unobstructed. There’s no gurgling, no noise - just an open path from the sewer line into the room.
A correctly installed P-trap curves down and then back up. The lowest point of the curved section sits below the drain arm outlet, and water pools there permanently between uses. When the trap is reversed, the curved section faces upward, the low point disappears, and water drains completely each time the sink runs.
This error is less common than a back-sloped drain arm, but it happens after a cleaning or a recent swap where the assembler didn’t check orientation. If you replaced the trap and the smell appeared immediately - within hours, not days - check the trap orientation before looking elsewhere in the system.
Minnesota Permit Rules for P-Trap Work
Minnesota law allows homeowners to perform plumbing work on a residence they own and occupy without a contractor license. A permit is still required for regulated plumbing work, even when the homeowner does the labor.
A like-for-like P-trap swap - same drain arm routing, same vent connection, nothing rerouted - is generally treated as maintenance by most Twin Cities jurisdictions and does not require a permit. The moment you change where the drain arm exits, add a vent connection, or correct an S-trap by moving the pipe from the floor to the wall, you are in regulated territory and a permit is required.
The permit process for owner-operator residential work is not burdensome. It is an administrative step, not a contractor qualification. The inspection that follows is the system confirming the installation is safe - which is worth having for any work that touches the venting system. Call the building inspection line for the City of Minneapolis or Saint Paul before you start if you are unsure whether your specific scope requires a permit. A permit pulled in advance is a non-event. A permit required after a failed inspection is a headache.
One Minnesota-specific note worth keeping in mind: if you are tackling this repair in late fall or early winter, be aware that older homes in the metro can have supply connections and drain stubs that have been stressed by prior freeze events. A frozen pipe can crack fittings that look intact from the outside. Inspect the drain stub-out and the supply shutoffs nearby before assuming the only issue is the trap.
When Replacing the Trap Didn’t Solve It
You installed a new trap correctly. The slope is right. The orientation is right. The smell came back within 24 hours.
This is the outcome none of the replacement guides address, and it is more common than it should be because the guides skip the diagnosis. If the smell returns that quickly, one of three things is true.
The venting system is the cause. Negative pressure in the drain stack siphons the new seal just as it siphoned the old one. No trap, new or old, can hold against a sustained pressure differential from a blocked or breached vent.
The sewer gas is not coming from this drain. Gas migrates through a house. A dry floor drain trap in the basement, a cracked vent pipe inside a wall, or an ejector pit with a failing seal can concentrate odor in a room far from the actual source. Replacing the sink trap does nothing for any of these.
The drain arm slope was not corrected. This is worth a second look. A drain arm that appears level to the eye can still pitch back by a fraction of an inch. Use a level before concluding the slope is fine.
If you’ve replaced the trap, confirmed the slope, and the odor persists, the problem is somewhere in the drain-waste-vent system that a visual inspection under the sink won’t reveal. A sewer camera trace can locate it in a single visit.
Northern Benjamin Franklin Plumbing is locally owned and operated in the Twin Cities. Our team can trace a sewer gas complaint to its source and tell you exactly what the repair involves. We back every appointment with the On-Time Guarantee(R): we arrive within the window you choose, or we pay you $5 for every minute we are late, up to $300. “If there is any delay, it’s you we pay!”
Call (763) 296-1844 or book online to schedule a drain inspection.
Frequently Asked Questions
How can I unscrew a stuck PVC P-trap? +
Need a technician now?