
Convert Bathtub to Walk-In Shower Plumbing: The Rough-In
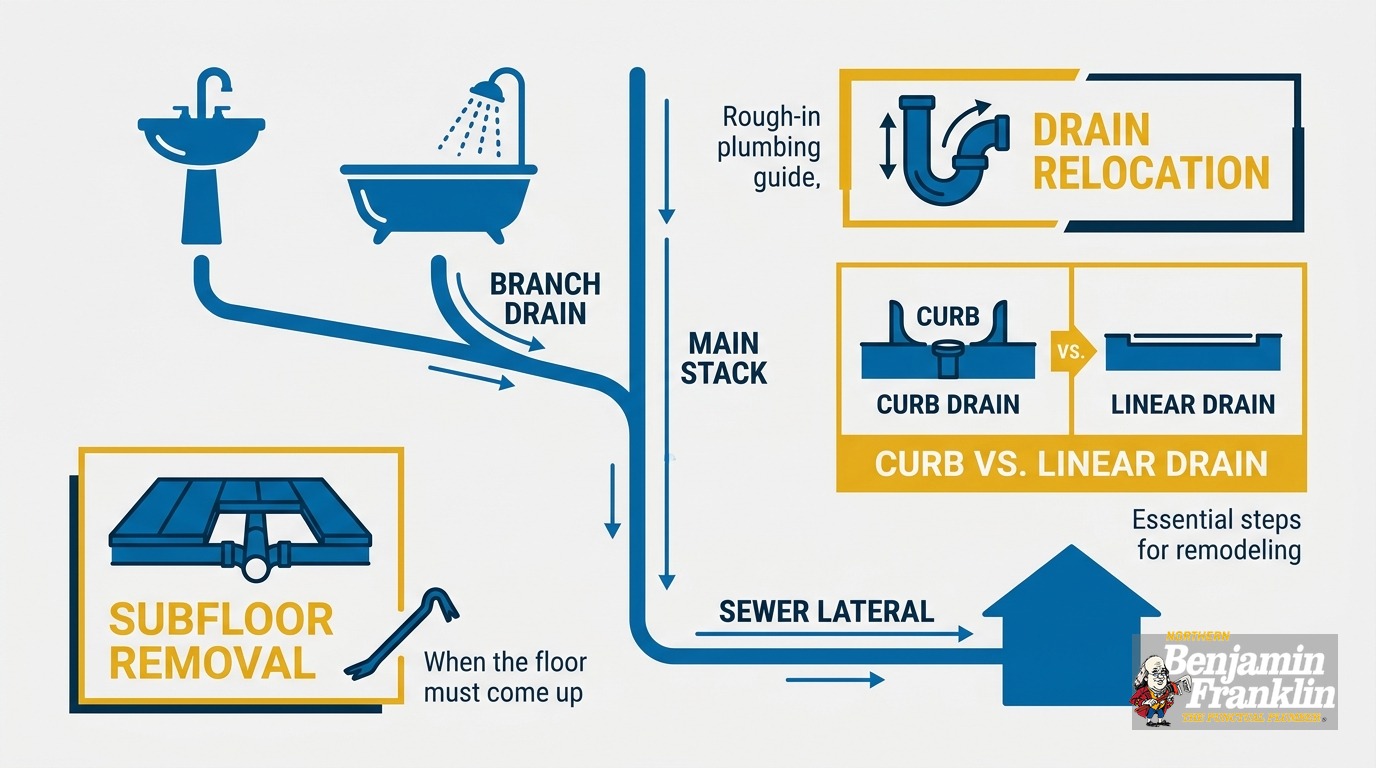
Key Takeaways
- Converting a tub to a walk-in shower requires moving the drain. A tub drain sits at one end of the fixture. A shower drain needs to sit at the center of the floor or along one wall.
- Minnesota Plumbing Code requires a minimum 2-inch shower drain. A standard tub drain is 1.5 inches. The entire horizontal run must be upsized, not just the drain body.
- The shower floor must slope 1/4 inch per foot toward the drain. For a curbless design, that means recessing the subfloor by 1.5 to 2.25 inches total.
- Joists have strict notching limits under Minnesota’s adopted residential code. I-joists and engineered lumber cannot be field-cut without the manufacturer’s written approval.
- Moving the drain more than 5 feet from the existing vent connection may require re-tying the vent. That means opening the wall back to the stack.
- Minnesota requires a plumbing permit for any drain relocation or fixture change. Drain, waste, and vent piping must pass a 5 PSI pressure test for 15 minutes before any covering goes in.
- Homes built before 1970 commonly have cast iron stacks near the end of their lifespan and rotted subfloor under the old tub surround. Budget 10 to 15% contingency on top of the base estimate.
Most guides on converting a bathtub to a walk-in shower focus on the visible work: tile, glass, the rainfall head. The plumbing rough-in gets a paragraph, maybe two. That’s fine for a general overview. It doesn’t work if your bathroom is in a Minneapolis rambler with a cast iron stack and a subfloor that’s been wet for fifty years.
This post covers what actually happens below the floor when you convert bathtub to walk-in shower plumbing. Drain relocation, slope math, joist limits, vent re-ties, and the Minnesota permit requirements that govern all of it are the parts most national guides skip. These are also the parts that determine what the job actually costs and how long it takes.
What Actually Changes When You Convert a Bathtub to a Walk-In Shower?
The short answer: The drain moves, the pipe diameter increases from 1.5 to 2 inches, and the subfloor gets recessed to accommodate the required slope. The vent connection may also need to be re-tied. That is the plumbing scope. The tile, glass, and fixtures come after all of it is done and inspected.
A bathtub drain sits at one end of the fixture. It connects to a 1.5-inch trap and a 1.5-inch horizontal run to the drain-waste-vent stack. A walk-in shower needs a drain at the floor’s low point: either centered in the floor or along one wall for a linear drain. That single change touches drain location, pipe size, floor structure, and sometimes the vent stack.
Each of those is a separate piece of work. A plumber pricing this job is looking at four scope items. The tile budget is a fifth. Understanding that breakdown before you get your first estimate prevents the surprise that hits homeowners who expected the plumber to be done in an afternoon.
Why Does the Drain Have to Move?
The short answer: A shower floor must slope 1/4 inch per foot toward the drain. The drain position determines where all the slope goes. If the drain stays at the tub’s end wall, the far wall sits 1 to 1.5 inches higher - creating a visible ramp that’s hard to tile evenly and harder to walk on comfortably.
Under MN Rule 4714.0408, the shower floor must slope at least 1/4 inch per foot toward the weep holes or drain. For a 5-foot-wide shower with a centered drain, the floor drops 0.625 inches from each side wall to the center. That’s manageable. A drain left at the end wall would require a 1.25-inch drop across the full 5-foot run from the far wall. That’s visible, uneven, and difficult to set large-format tile on.
So the drain moves. The shift is typically 18 to 30 inches from the original tub drain position. Moving the drain means cutting the subfloor, repositioning the trap, and running new horizontal pipe to the vent connection. It also means replacing the 1.5-inch line.
Minnesota Plumbing Code requires a minimum 2-inch shower drain. The upsizing applies to the full horizontal run to the vent connection, not just the drain body. Per Rosenberry Rooms’ bathtub-to-shower drain conversion guide, if the existing drain pipe is too narrow, the entire run gets replaced.
What Happens to the Vent When the Drain Moves?
The short answer: A vent connection is required within 5 feet of the trap. Move the drain outside that radius and the existing vent is too far away. Re-tying the vent means opening the wall back to the stack or adding an air admittance valve where local code permits it.
This is the step no national guide explains, and it’s the one most likely to extend the project timeline.
The tub’s vent ties into the stack at a specific height and location. When the drain moves, the new trap must fall within 5 feet of a vent connection. This is the standard venting distance requirement, as detailed in Rosenberry Rooms’ bathtub-to-shower drain conversion guide. If the drain moves 18 inches, the existing vent connection may still be close enough. If it moves 30 inches and the original vent was tight to the end wall, the new drain position may fall outside the allowable distance.
When that happens, the plumber has two options. The first is opening the wall back to the stack and tying in a new vent at the correct height. The second is an air admittance valve (AAV), in jurisdictions that permit them. Not all Minnesota municipalities allow AAVs, so confirm with your local authority before counting on that option.
Either way, this work happens inside the wall, not below the floor. It adds labor and, sometimes, drywall repair to the project scope.
Curb Drain vs. Linear Drain: Which One Fits Your Bathroom?
The short answer: A center-point drain requires four-way slope, with the floor rising in all directions from the drain. A linear drain slopes in one plane only, which simplifies large-format tile work but typically moves the drain farther from the original vent tie-in. Your plumber and tile setter need to agree on the drain type before demo starts.
A center-point drain is what most traditional shower pans use. The subfloor recess sits directly at the drain, and the floor rises evenly in all four directions. Tile setters call this a four-way slope. For standard tile sizes it works well. For 24-by-24-inch or larger tile, compound angle cuts at every slope change become time-consuming and difficult.
A linear drain runs the full length of one wall, usually opposite the showerhead. The floor slopes in one direction only: showerhead wall toward the drain channel, at 1/4 inch per foot. That one-plane slope is the standard for linear drain installations, per Iron and Water Co.’s linear drain specification guide. One plane eliminates compound tile cuts entirely. That is why large-format tile and linear drains are often paired together.
The structural consequence: a linear drain requires the subfloor to be recessed along one long edge of the shower opening. Depending on joist direction, that recess may run parallel to the joists or across them. If it runs across them, you are notching multiple joists, and the IRC limits on notch depth apply to each one. A plumber and sometimes a structural review may both be needed before demo begins.
Neither drain type is inherently better. The right choice depends on tile layout, joist direction, and how far the new drain position falls from the existing vent tie-in.
What Happens to the Subfloor When You Go Curbless?
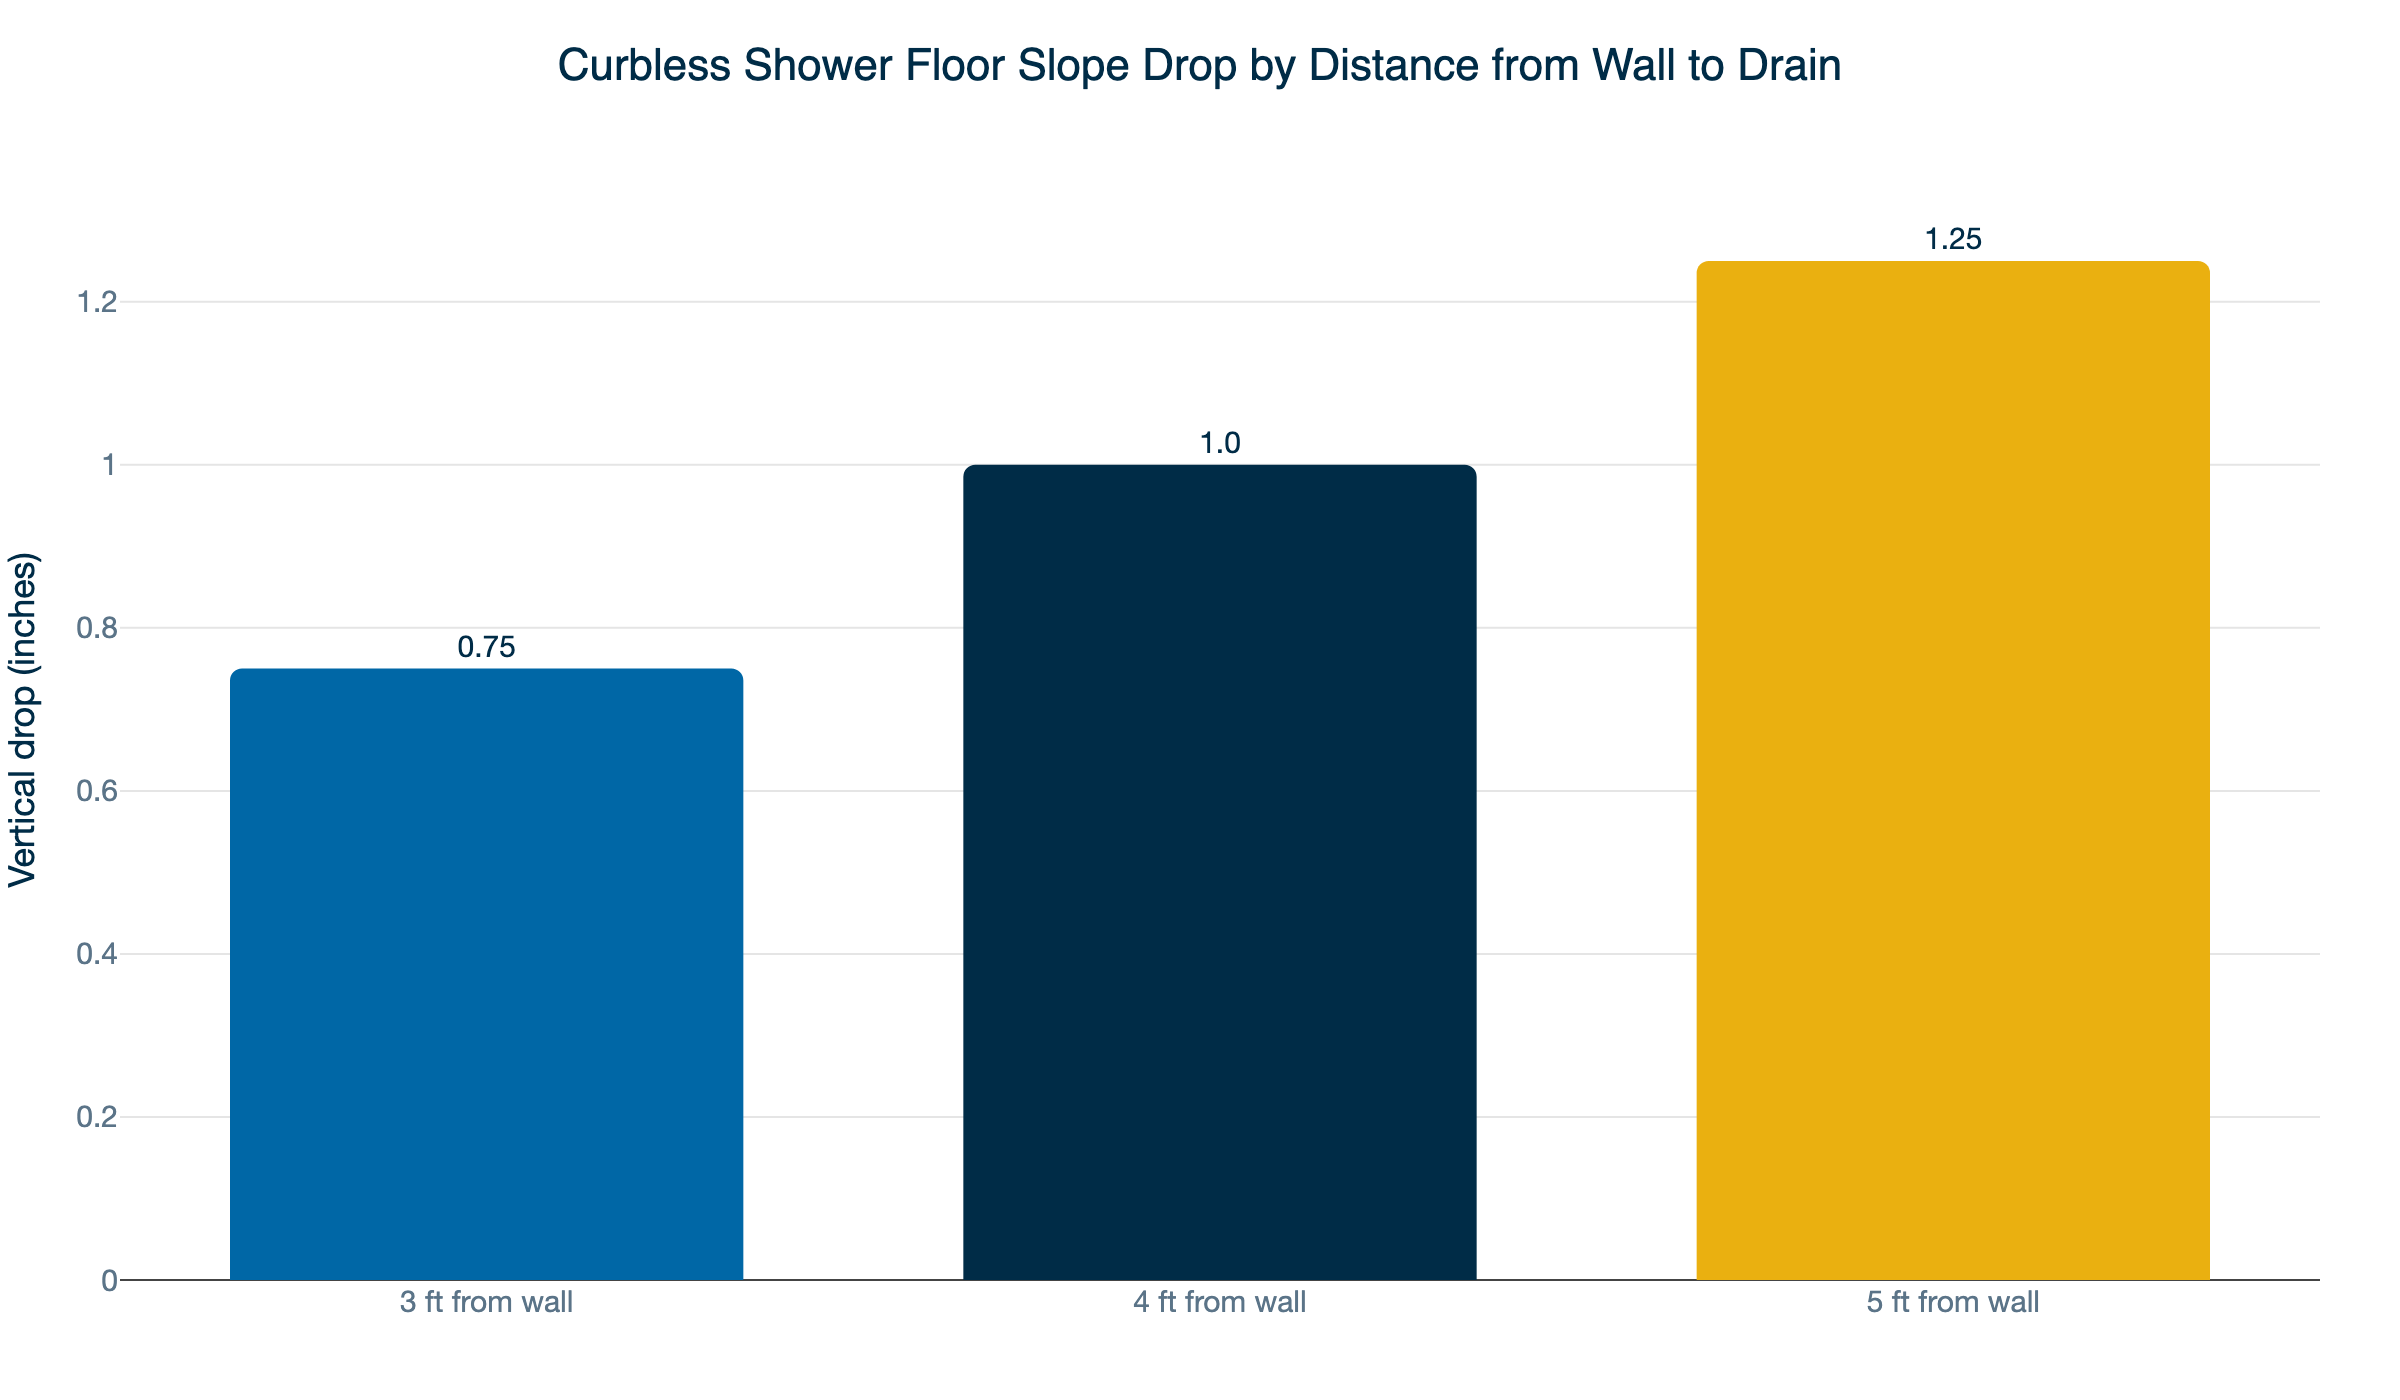
The short answer: The subfloor must be recessed below the surrounding floor so the mortar bed and finished tile end up flush with the adjacent bathroom floor. According to DIY Tile Guy’s subfloor recess guide, a 4-foot run from wall to drain requires 1.00 inch of vertical drop before adding the mortar bed thickness.
The total recess is the slope component plus the mortar bed minimum. For most curbless conversions, total subfloor recess runs 1.5 to 2.25 inches below the surrounding floor level. That means cutting the subfloor panels and working around the joists below.
This is where structural limits become real constraints.
Minnesota has adopted IRC R502.8 floor joist requirements, which set hard limits on what can be cut:
- Notches in the top or bottom of a joist cannot exceed 1/6 of the joist depth.
- No notching is allowed in the middle third of the joist span.
- Bored holes cannot exceed 1/3 of the joist depth and must stay at least 2 inches from the top and bottom edges.
- I-joists and engineered lumber cannot be field-cut or notched without the manufacturer’s written approval.
In a 1950s home with 2x8 joists, a plumber is working with roughly 7.25 inches of actual joist depth and strict limits on what portion of it can be removed. Getting a 2-inch drain pipe, a trap, and a clean horizontal run through that space without violating the notching rules requires careful layout before the first saw cut.
When the recess depth and the drain rough-in together exceed what the joist limits allow, a structural fix is required before plumbing can continue. That might mean sistering a joist, adding blocking to redistribute floor load, or rerouting the drain to avoid the middle-third zone. It adds time and cost. It is not optional under Minnesota code.
Do I Need a Permit for a Tub-to-Shower Conversion in Minnesota?
The short answer: Yes. Any drain relocation, pipe upsizing, or fixture change requires a plumbing permit. In Minneapolis, the minimum permit fee is $85.20, with $41.40 per fixture. A full conversion with drain relocation typically runs $300 to $700 in total permit fees depending on scope.
The permit triggers a rough-in inspection before any tile or wall covering goes in. At that inspection, drain, waste, and vent piping must hold 5 PSI. The inspector also verifies drain size, slope, trap depth, and vent placement.
Unpermitted plumbing work can affect homeowner’s insurance coverage if a leak causes water damage later. It also becomes a disclosure item when you sell the home. Buyers and their inspectors ask about permitted work. Unpermitted plumbing in a bathroom can delay or complicate a closing.
The rough-in inspection is also your protection as a homeowner. It confirms the work was done correctly before tile buries it. If something is wrong, fixing it before the shower is tiled is a few hours of plumbing work. Fixing it after is a full demo.
What Does the Plumber Test Before the Tile Goes In?
The short answer: Two tests. First, a flood test: the shower liner is filled and held for 24 hours to confirm no leaks through the waterproofing. Second, a pressure test: all drain, waste, and vent piping must hold 5 PSI for 15 minutes before any covering is installed.
MN Rule 4714.0408 requires the flood test for site-built shower receptors. A curbless mortar-bed shower qualifies as a site-built receptor. The liner must extend at least 3 inches above the finished dam or threshold before the flood test can start.
These tests exist because a failed waterproofing joint, once buried under mortar and tile, is invisible until water has already rotted the subfloor and the joists below it. By then, the repair involves demolishing the finished shower. The tests catch failures when fixing them is still a matter of hours, not days.
The Cast-Iron Reality in Twin Cities Older Homes
Most bathrooms in South Minneapolis, St. Paul, and the inner-ring suburbs sit in homes built between 1950 and 1970. Those homes almost always have cast iron drain lines. Cast iron installed before 1970 is at or near the end of its 40-to-70-year lifespan.
A stack that looks solid from the outside can be paper-thin at the hub, where decades of drain gas have corroded the iron from the inside. You find this out when demo starts - not before. For more on what to look for before a stack reaches that point, see our guide on cast-iron drain pipe failure signs in Twin Cities homes.
The supply lines in these homes are often galvanized steel. Galvanized pipe corrodes from the inside, narrowing the flow diameter over time. If you’re already opening walls for a shower conversion, a plumber can assess the supply lines while the wall is accessible. Our post on galvanized pipe replacement in older Twin Cities homes covers what to look for and when replacement makes sense.
Neither assessment adds significant time if the plumber is already on-site. Finding the same problem after tile is set costs much more.
What Should Twin Cities Homeowners Budget as Contingency?
The short answer: Contractors working in pre-1970 homes commonly recommend 10 to 15% contingency above the base estimate. The two most common surprises in a tub-to-shower conversion are rotted subfloor under the old tub surround and a cast iron stack section that needs replacement before new pipe can connect to it.
Subfloor rot is nearly universal in bathrooms where the tub surround has been in place for 30-plus years. Water wicks through grout lines and around the tub lip, soaking the subfloor panels below over time. By the time the tub comes out, the panels are often soft. A joist or two may have started to degrade. The repair is straightforward, but it adds a day and materials to the timeline.
A partial stack replacement is a common finding. Cutting out a failing section and splicing in Schedule 40 PVC is routine work for a plumber. A full stack replacement - from the basement slab to the roof vent - is less common but not rare in homes where the original cast iron has been in service since the 1950s. Neither can be accurately priced without seeing what demo reveals.
For a full picture of what a bathroom remodel plumbing scope looks like, see our guide on bathroom remodel plumbing: what to know. For the specifics of Minnesota rough-in requirements and what the inspection process involves, our post on adding bathroom plumbing rough-in in Minnesota covers the code details.
Ready to Convert Your Bathtub to a Walk-In Shower?
Converting a tub to a walk-in shower is not a weekend tile project. The plumbing rough-in involves licensed work, a pulled permit, and a code inspection. In a Twin Cities home built before 1970, it often includes contingency repairs that don’t show up in any estimate until demo is underway.
Northern Benjamin Franklin Plumbing is a locally owned and operated Twin Cities plumbing company. Our team handles the full rough-in from permit to pressure test. We coordinate with your tile contractor on drain placement before anything gets cut, so there are no surprises when the subfloor comes up.
We back every appointment with our On-Time Guarantee(R). If there is any delay, it’s you we pay! Call us at (763) 296-1844 or book online to schedule an estimate on your tub-to-shower conversion.
Frequently Asked Questions
Do I need a permit to convert a bathtub to a walk-in shower in Minnesota? +
How far does the drain move in a tub-to-shower conversion? +
Can I convert a tub to a walk-in shower myself in Minnesota? +
Need a technician now?