
Bathtub Spout Diverter Repair: Which Type Do You Have?
Key Takeaways
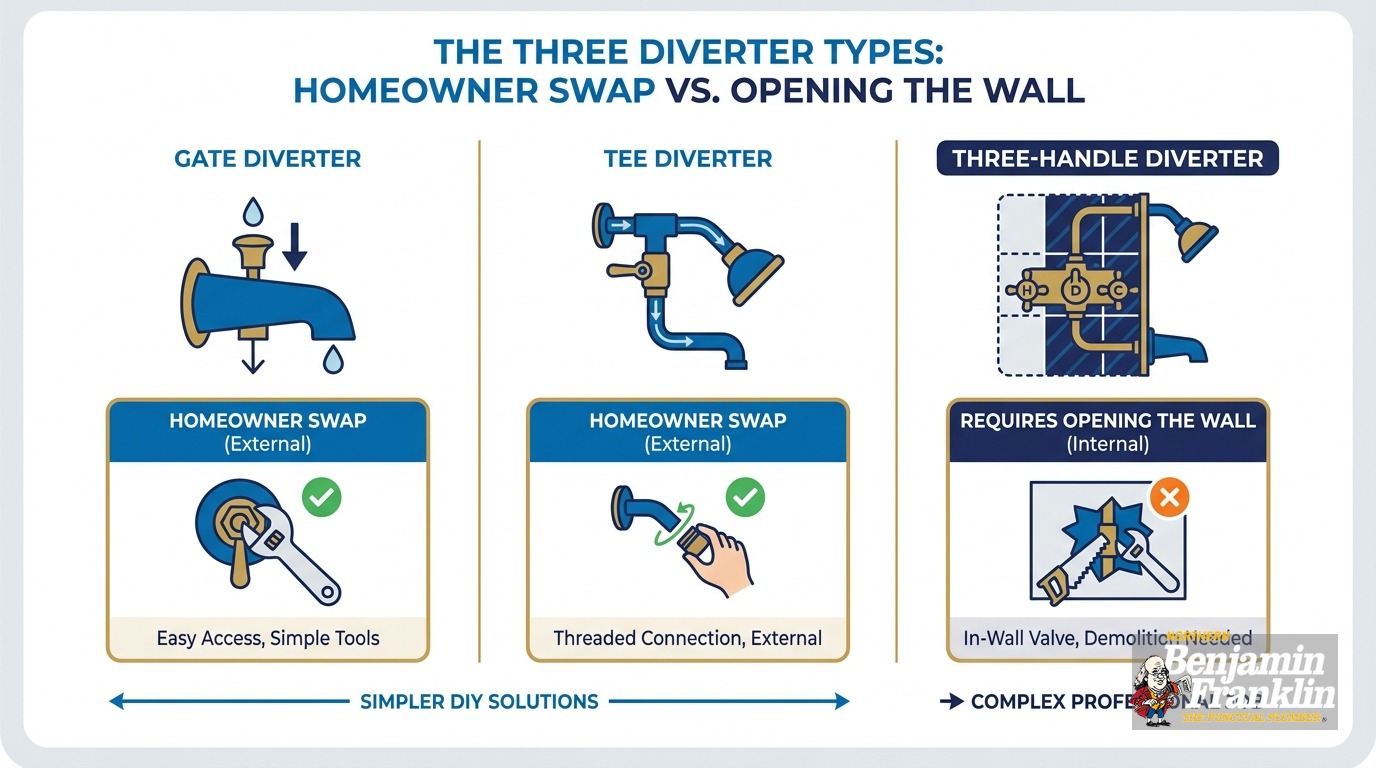
- Three diverter types: tee diverter (knob on top of the spout), gate diverter (pull-up tab at the spout front), and three-handle diverter (a separate handle on the wall between hot and cold controls).
- Tee and gate diverters are self-contained inside the spout body. Replace the spout. No wall access needed.
- Three-handle diverters have a valve stem in the wall behind the escutcheon plate. Trim removal is required. Tile work is sometimes required. This is usually a plumber job.
- Twin Cities water hardness (Minneapolis: 5.4 GPG, St. Paul: 5.26 GPG) is the most common reason tee-diverters fail in this market. A vinegar soak costs nothing and is always worth trying before you buy anything.
- No permit is needed to replace a tub spout under Minnesota plumbing code. In-wall valve body replacement is a different matter.
- Call (763) 296-1844 or book online if you have a three-handle diverter, if the nipple is corroded, or if you are not sure what you are dealing with.

Water Still Coming Out of the Spout? Here Is What Is Happening.
You pull the diverter to send water up to the shower head. But water still dribbles from the tub spout below. The fix depends entirely on which type of diverter you have. One type lives entirely inside the spout. No wall work. No permit. A 30-minute swap. The other has a stem behind your tile wall. That one usually means calling a plumber. This post gives you the decision tree that competitor guides skip: which type do you have, what is causing the failure, and what Minnesota code actually says about permits.
What Type of Diverter Do You Have?
Look at your spout and your shower wall controls. A knob or pull-up tab on the spout itself means a tee or gate diverter: the whole mechanism is inside the spout body. A third handle on the wall between your hot and cold controls means a three-handle diverter with the valve stem behind the tile. No tools needed to make this call.
Here is how to read each type:
Tee diverter: A small round knob sticks up from the top of the spout. You push or twist it to divert. The mechanism is a rubber gate built into the spout body itself. When it fails, the gate can no longer seat cleanly against its rubber seal.
Gate diverter: A pull-up tab or T-bar sits at the front of the spout. You pull it up to send water to the shower head. This is the most common type in Twin Cities homes built from the 1980s onward. The gate and seat are both inside the spout.
Three-handle diverter: Your shower wall has three handles: hot, cold, and a center diverter control. There is no knob on the spout itself. The third handle operates a valve stem threaded into a valve body behind the wall. This type can look completely normal from the outside, which is one reason it confuses homeowners.
If you are still unsure, a quick faucets and fixtures inspection takes a few minutes and removes any guesswork before you start pulling hardware.
Tee and Gate Diverters: Everything Is Inside the Spout
If you have a tee or gate diverter, the entire mechanism is inside the spout body. Nothing behind the wall is involved. The diverter gate sits on a rubber seat inside the spout casting. When you divert, the gate seals the spout outlet and pressure redirects water upward to the shower head.
When the rubber gate wears out or mineral scale builds up on the seat, the gate can no longer form a complete seal. Water follows the path of least resistance. It escapes from the spout even while the diverter is engaged. You hear it and feel the reduced shower pressure at the same time.
The repair is a spout swap, not a valve job. You replace the whole spout as a unit. Most homeowners complete this in 20-45 minutes. Here are the steps:
- Look under the spout near the wall for a set screw. Slip-fit spouts have one. Threaded spouts do not.
- Loosen the set screw with an Allen wrench (slip-fit), or unscrew the spout counterclockwise (threaded). A rubber strap wrench protects the spout finish. Do not use standard pliers on chrome or brushed nickel.
- Pull the spout straight away from the wall (slip-fit) or continue rotating to remove (threaded).
- Inspect the nipple. Look for corrosion, stripped threads, or cracks.
- Measure the nipple length from the wall face to the end of the pipe stub. Threaded spouts have a minimum and maximum nipple length. Outside that range, the spout will not install flush.
- Buy a replacement that matches the attachment style and nipple length.
- Install in reverse. Slip-fit: push onto the nipple and tighten the set screw (snug, not overtightened). Threaded: wrap the nipple threads with PTFE tape, hand-tighten, then snug with the strap wrench.
- Restore water and test both tub and shower positions.
You do not need to shut off the in-wall supply valve just to change the spout. Shutting off at the main is good practice and prevents a surprise if the nipple turns out to be corroded. But the in-wall supply pipe is not exposed during a straightforward spout swap.
If the nipple is corroded, stripped, or damaged when you pull the spout, stop. Changing a nipple means working on the supply line. That moves beyond a spout swap and warrants a plumber call.
Three-Handle Diverter: The Stem Lives in the Wall
A three-handle diverter is a different repair category entirely. The valve stem that switches between tub and shower is threaded into a valve body behind the wall. You access it by removing the diverter handle and the decorative escutcheon plate.
Here is what makes this harder than a spout swap. If the stem is worn or the packing is leaking, you can rebuild the stem without cutting the wall. Pull the stem, replace the packing and O-rings, reinstall. But if the valve body itself is corroded, cracked, or scaled beyond the point of seating cleanly, the body needs replacement. Replacing the valve body means opening the wall. In a tiled shower, that means careful tile removal or cutting access.
Before any three-handle diverter work, shut off the water supply to that bathroom. Local shutoffs are usually behind an access panel in an adjacent closet or hallway. If there are no local shutoffs, use the main house shutoff at the meter.
Because the valve body is part of the supply piping in the wall, replacing it may require a permit in Minnesota (more on that below). This is also the point where a licensed plumber’s involvement protects you. They can assess whether it is a stem rebuild or a valve body replacement before any tile is touched.
If your three-handle shower also runs temperature swings (scalding hot when someone flushes a toilet, for example), that points to a pressure balance issue, not just a diverter problem. Our post on why your shower gets scalding hot when the toilet flushes covers that diagnosis in full.
How Does Twin Cities Water Hardness Cause Diverter Failure?
Mineral scale is the most common reason tee and gate diverters fail in Minneapolis and St. Paul. At 5.4 GPG in Minneapolis and 5.26 GPG in St. Paul, the treated tap water still carries enough dissolved calcium and magnesium to build up inside fixture parts over three to five years of daily use.
Both cities treat their source water to reduce hardness before it reaches homes. Minneapolis removed roughly 65,000 lbs of hardness per day in 2025. That figure comes directly from the City of Minneapolis Monthly Water Analysis. Saint Paul Regional Water Services lime-softens from raw source water in the 20s GPG range and delivers water at approximately 5.26 GPG (90 ppm as CaCO3) at the tap. Both cities land in the moderately hard range.
The Water Quality Association confirms that hard water produces scale buildup on sinks, tubs, faucets, and appliances. Inside a tee or gate diverter, hot water passes through the spout body multiple times every day. Calcium and magnesium deposits accumulate on the rubber gate seat and inside the spout casting over time. The first sign is exactly what you noticed: the shower head runs but water still escapes from the spout below. The gate is no longer seating against its deposit-coated seat.
Before you buy a replacement spout, try a vinegar soak. Fill a gallon zip-top bag about halfway with undiluted white vinegar. Slide it over the spout so the diverter end sits fully submerged. Secure the bag with a rubber band or zip tie around the spout neck. Leave it overnight, at least eight hours. The mild acid dissolves calcium and magnesium deposits without harming chrome, brushed nickel, or matte black finishes. In the morning, run the tub water for two minutes to flush the spout, then engage and release the diverter 10 to 15 times to work loosened scale out of the seat. This restores a clean gate seal on many spouts without spending a dollar.
If the vinegar soak does not resolve the drip, the rubber gate or seat is physically worn. Scale removal is not enough at that point. A replacement spout is the next step.
How to Clean a Shower Diverter Valve?
For a tee or gate diverter, cleaning means an overnight vinegar soak with no disassembly required. Submerge the spout end in white vinegar for 8-12 hours, then cycle the diverter 10-15 times to clear loosened scale. For a three-handle diverter, cleaning the internal stem seats requires stem removal and is a plumber’s job.
Step-by-step for the vinegar method on a tee or gate spout:
- Fill a gallon zip-top bag about halfway with undiluted white vinegar.
- Slide the bag up and over the spout so the diverter end sits fully submerged.
- Secure the bag with a rubber band or zip tie around the spout neck, tight enough to hold the bag in place.
- Leave the bag on for at least 8 hours. Overnight is ideal.
- Remove the bag and run the tub water for two minutes to flush any dissolved minerals and residual vinegar from the spout.
- Engage and release the diverter 10-15 times with the water running to work any remaining scale out of the gate seat.
This method is the same technique used to clear scale from shower heads and faucet aerators. It works because white vinegar is mildly acidic. It dissolves calcium carbonate deposits without damaging metal or rubber components. If scale buildup is a recurring problem across your fixtures, the underlying cause is your water’s mineral content. A whole-home water softener slows scale accumulation throughout your entire plumbing system.
If a slow shower drain is compounding your frustration alongside a faulty diverter, those are separate issues. Our post on what is actually in a slow shower drain clog walks through the common causes and the fastest ways to clear them.
How to Fix a Broken Tub Spout?
If the diverter is in the spout (tee or gate type), the repair is a full spout replacement. Shut off water at the main, remove the old spout by loosening the set screw or unscrewing counterclockwise, match the nipple length and attachment style, install the replacement, restore water. Most homeowners finish in under an hour.
Complete repair sequence:
Step 1: Confirm the attachment style. Look under the spout near the wall. A set screw underneath means slip-fit. No set screw means threaded.
Step 2: Shut off water. The in-wall supply pipe is not exposed during a spout swap. But shutting off at the main keeps the work dry if the nipple surprises you.
Step 3: Remove the old spout. Slip-fit: loosen the set screw with a hex key and pull the spout straight away from the wall. Threaded: grip with a rubber strap wrench and rotate counterclockwise until the spout comes free. Never use standard pliers on a finished spout. They scratch chrome and crush brushed finishes.
Step 4: Measure the nipple. The nipple is the short pipe stub coming out of the wall tile. Measure from the wall face to the end of the nipple in inches. This measurement is critical for threaded spouts. Too short, and the spout will not reach the wall. Too long, and it cannot tighten down flush.
Step 5: Buy the right replacement. Bring the old spout to the store, or bring your nipple length measurement and note slip-fit or threaded. See the FAQ below on universal fit before assuming any spout will work.
Step 6: Install and test. Slip-fit: push the new spout onto the nipple and tighten the set screw until snug, not overtightened. Threaded: wrap PTFE tape around the nipple threads, hand-tighten the spout, then snug with the strap wrench. Restore water and test the tub position and shower position both.
If pulling the spout reveals a corroded or stripped nipple, stop the repair there. A damaged nipple requires work on the supply line. That is not a spout swap anymore.
Does This Repair Need a Permit in Minnesota?
Replacing a tub spout does not require a permit. Minnesota Rules Chapter 4714 classifies replacing the internal working components of existing valves as routine maintenance. Minnesota law confirms that homeowners can legally perform certain plumbing work on their own property. Owner-occupants of a primary residence may perform this maintenance themselves.
The permit question gets more complicated as the repair moves toward the wall:
- Tub spout replacement (tee or gate): no permit required for owner-occupants.
- Three-handle diverter stem rebuild: replacing the stem, packing, and O-rings inside the existing valve body generally falls under the maintenance exemption, because no piping is altered.
- Three-handle valve body replacement: this alters the supply piping and moves into permit territory. Twin Cities municipalities are explicit about this. Blaine, Minnesota, lists plumbing alterations as requiring a permit. Other metro cities follow the same line.
The permit on valve body work is not just paperwork. It requires an inspection, which catches installation errors before they become leaks trapped inside a tiled wall for years. When a licensed plumber does the work, they handle the permit as part of the job. It is not an add-on charge.
When to Call Northern Benjamin Franklin Plumbing
A tee or gate diverter spout swap is a legitimate weekend repair for a homeowner who is comfortable turning off water and using basic hand tools. For everything listed below, call us first:
- You have a three-handle diverter and the stem or valve body needs work.
- You pulled the old spout and the nipple is corroded, cracked, or has stripped threads.
- You tried the vinegar soak and replaced the spout, and water still escapes from the spout during shower use. At that point, the problem may be a pressure issue or an in-wall valve condition, not the spout.
- You are not sure which type of diverter you have and do not want to start pulling hardware to find out.
- There is water behind the wall, under the tub, or seeping through the floor around the tub surround. That may not be a diverter problem at all. A shower pan leak can look similar to an in-wall supply leak from the outside, and the two have very different repairs.
As a locally owned and operated Twin Cities plumbing company, we are backed by the national Benjamin Franklin Plumbing network and our On-Time Guarantee(R). We arrive in the window you pick. If there is any delay, it’s you we pay! Call (763) 296-1844 or book online to schedule a diverter diagnosis or repair.
Frequently Asked Questions
Are all tub diverters universal? +
Where can I find a shower diverter repair kit? +
Need a technician now?