
Bathtub Drain Stopper Replacement: Identify Your Type First
Key Takeaways
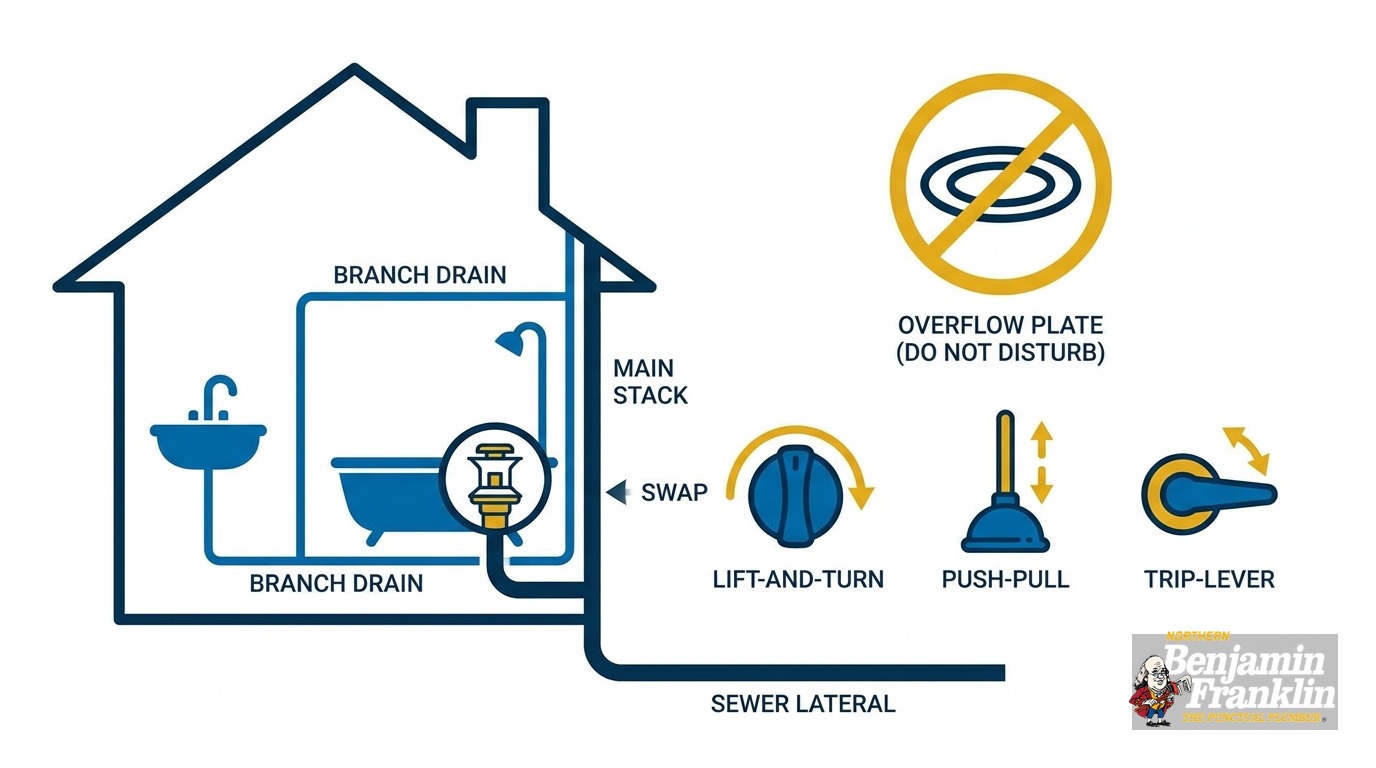
- There are three main stopper types in Twin Cities homes: lift-and-turn, push-pull, and trip-lever. Identify yours before buying anything.
- Check the overflow plate on the tub wall first. A lever or flip switch on that plate confirms trip-lever. No lever means the stopper is at the drain floor.
- Trip-lever is the only type that requires removing the overflow plate. For lift-and-turn, push-pull, and toe-touch types, leave the plate alone. Disturbing it risks the gasket behind it and can create a hidden wall leak.
- Twin Cities tap water runs 5 to 7 grains per gallon. Scale builds on set screws and brass linkage rods. Apply penetrating oil before you disassemble anything.
- Two drain thread standards are common: 1-3/8 inch fine (NPSM) and 1-1/2 inch coarse. They are not interchangeable. Measure before buying.
- For trip-lever stoppers, check linkage depth after installation. A rod that is too long slows drainage even in the open position.
- On a homesteaded single-family home in Minnesota, swapping stopper components typically requires no plumbing license and no permit. Disturbing the drain body or overflow tube connection changes that calculus.
What Type of Bathtub Drain Stopper Do You Have?
Short answer: Check the overflow plate on the tub wall first. A lever or flip switch built into that plate means trip-lever: the stopper mechanism is inside the overflow tube, not at the drain floor. No lever means look down at the drain. A knob you lift and rotate to seal is lift-and-turn. A stopper you press to close and press again to open is push-pull. This two-point check takes under a minute and determines every step that follows.
Two spots on the tub give you the identification. Most homeowners skip the first one entirely and reach straight for the drain. That is how the wrong part ends up in the shopping cart.
Check the overflow plate first. The overflow plate is the small cover on the tub wall, below the faucet. It hides the overflow pipe, the tube that stops the tub from spilling onto the floor. If that plate has a lever, knob, or flip switch, you have a trip-lever stopper. The control is at the wall. The plug is a brass plunger inside the overflow tube. Nothing at the drain floor moves when the tub fills.
If the overflow plate is a plain cover with no moving parts, the stopper is at the drain floor.
Check the drain floor. A stopper with a cap or knob you lift and rotate clockwise to seal is lift-and-turn. A stopper you press down to close and press again to release is push-pull. A toe-touch stopper works the same way but responds to a push from your foot. A flat strainer grate with no visible mechanism, paired with a plain overflow plate, is unusual. Look more carefully before assuming the stopper type.
Write down what you find before leaving for the store. It determines which replacement kit you need and whether you are touching the overflow plate at all.
Lift-and-Turn Stoppers
A lift-and-turn stopper has a knob or small cap on top. You lift it to let the tub drain, then press down and rotate clockwise to seal. Internally, a threaded brass post screws into the crossbar inside the drain body. The stopper body threads onto that post. A small set screw, usually Phillips or hex head, sits under the decorative cap and locks the knob’s position.
Hard water is the main reason these stoppers resist removal in Minnesota homes. Minneapolis treated tap water has moderate hardness. St. Paul’s treated water, from the McCarrons Water Treatment Plant, arrives at the tap in a similar 5 to 6 GPG range. That is moderate hardness. Daily contact with brass threads and small set screws deposits mineral scale over time. Before removing a lift-and-turn stopper in a Twin Cities home, apply penetrating oil at the base and under the cap. Wait at least 10 minutes. Skipping that step is how set screws get stripped.
Push-Pull Stoppers
A push-pull stopper has no knob. Press it down to close, press again to open. Internally, a spring-loaded brass post threads into the drain crossbar. The stopper body threads onto that post. To remove, grip the stopper body and turn counterclockwise. If it resists, apply penetrating oil at the base and wait. Once the body is off, the post unscrews the same way.
Scale affects push-pull posts exactly as it affects lift-and-turn set screws. The penetrating oil step is not optional.
Trip-Lever Stoppers
Trip-lever stoppers operate entirely from the overflow plate. Flipping the lever on the plate raises or lowers a brass plunger or linkage rod assembly inside the overflow tube. When the plunger descends, it blocks the drain passage. When it rises, the drain opens. At the drain floor you may see a strainer grate with no moving parts, or nothing at all.
This is the only stopper type that requires removing the overflow plate to service the mechanism. That distinction matters for the next section.
Does Your Stopper Type Require Removing the Overflow Plate?
Short answer: Only trip-lever replacement requires it. For lift-and-turn, push-pull, and toe-touch types, the overflow plate stays on the wall. Removing it when the job does not call for it risks the foam or rubber gasket behind it. That gasket seals the overflow tube opening. Compromise it and water can enter the wall.
This is the detail that separates a clean stopper swap from a new problem. The overflow plate screws into the tub wall and compresses a gasket against the tub’s finished surface. That gasket creates the watertight seal between the plate and the overflow opening. Each removal and reinstallation cycle risks tearing, compressing, or displacing the gasket. Federal housing standards classify inadequate sealing between joined plumbing components as a deficiency when it allows water into unintended areas - a precise description of what a compromised overflow plate gasket does. Water enters the wall framing and subfloor quietly. It can run for months before a ceiling stain or soft spot in the floor gives it away.
None of the top-ranking articles on this topic mention the gasket risk. Knowing your stopper type before picking up a screwdriver is the step that prevents accidentally creating a hidden leak while fixing something that was never a leak problem.
If your stopper operates from the drain floor, the overflow plate is not part of your replacement. Leave it in place.
How Do I Get a Stuck Drain Stopper Out?
Short answer: For lift-and-turn types, apply penetrating oil to the set screw and base, wait 10 minutes, back out the set screw, then unscrew the stopper body counterclockwise. For push-pull types, grip the stopper body and unscrew counterclockwise after soaking. For trip-lever, remove the two overflow plate screws and pull the entire linkage assembly up and out through the overflow opening.
Lift-and-turn removal:
- Pry off or unscrew the decorative cap from the top of the knob.
- Locate the set screw at the knob base (Phillips or hex head).
- Apply penetrating oil to the screw and around the stopper base. Wait 10 minutes.
- Back out the set screw and lift the knob free.
- Grip the stopper body and turn counterclockwise to unscrew it from the post.
- If the brass post remains in the drain body, wrap it with a cloth, grip with pliers, and turn counterclockwise.
Push-pull removal:
- Grip the stopper body and turn counterclockwise.
- If it resists, apply penetrating oil at the base and wait.
- Once the body is off, the post unscrews the same way.
Trip-lever removal:
- Remove the two screws from the overflow plate.
- Pull the plate away from the wall and continue pulling the linkage rods up and out through the overflow opening.
- Expect hair and debris wound around the rods. Trip-lever linkage collects hair on the brass rods inside the overflow tube where it is invisible until drainage slows. Clean the rods thoroughly before comparing them to the replacement kit.
- If the rods resist, apply penetrating oil at the upper joint and wait before pulling again.
If the stopper or post is frozen solid after penetrating oil and will not respond to steady force, stop. Forcing a stuck post risks snapping it or cracking the drain body’s crossbar. A snapped post in the drain body turns a stopper swap into a full drain body replacement. That is a different job. At that point, call (763) 296-1844 or book online.
How Do I Install a Bathtub Drain Stopper?
Short answer: Thread the replacement post clockwise into the drain crossbar, attach the stopper body, and test with 3 to 4 inches of water. For trip-lever, feed the linkage down through the overflow tube, seat the plate without tightening the screws, adjust linkage depth until the drain works correctly in both positions, then tighten.
Measure the drain thread before you buy. Two standards cover most U.S. bathtubs: 1-3/8 inch fine NPSM thread and 1-1/2 inch coarse thread. They are not interchangeable. A replacement post in the wrong size will thread on for a turn or two before binding. Bring the old post to the hardware store, or use a thread gauge before you go. Older Twin Cities homes, especially those built before 1970, sometimes have drain bodies with threads that do not match modern replacement kits. If the new post does not thread cleanly by hand for the first several turns, stop. Forcing mismatched threads strips the drain crossbar and changes the scope of the job.
Lift-and-turn and push-pull installation:
- Thread the new post clockwise into the drain crossbar. Hand-tight, then snug with padded pliers.
- Thread the stopper body onto the post counterclockwise.
- For lift-and-turn, install and tighten the set screw under the cap.
- Fill the tub 3 to 4 inches and let it sit 5 minutes. Watch for seeping at the stopper base.
- Open the stopper and confirm the water drains freely.
Trip-lever installation:
- Feed the replacement linkage rods brass-end-down through the overflow opening.
- Seat the overflow plate against the wall. Start the screws by hand but do not tighten them yet.
- Check linkage depth. A linkage rod that is too long partially blocks the drain port and slows drainage even when the stopper lever is set to open. Most kits include an adjustment nut on the lower rod. Shorten or lengthen until the drain flows freely with the lever open.
- With the lever set to closed, fill the tub 3 to 4 inches. It should hold without seeping.
- Flip the lever to open. Confirm normal drain rate.
- Tighten the overflow plate screws only after both positions test correctly.
Testing both positions before the final tighten takes one tub fill. Skipping this step and discovering a problem later means removing the plate again.
Why Is My Bathtub Leaking From the Drain Underneath It?
Short answer: A leak below the tub - stains on the ceiling below, soft spots in the floor near the tub, or water visible on the drain pipe exterior during a bath - usually points to a failed drain body seal or a disturbed overflow plate gasket. Neither is a stopper problem. Both require resetting the affected seal, not swapping the stopper mechanism.
This comes up often because a stopper that will not seal and a drain that leaks below the tub both cause the tub to lose water. The failure modes are different. A stopper with a bad seal lets water seep past the stopper at the drain opening. The leak stays at the tub surface. A drain body seal failure or overflow plate gasket failure sends water outside the drain pipe, into the subfloor framing and behind finished walls.
Signs the leak is below the tub rather than at the stopper:
- Water stains or soft drywall on the ceiling directly below the bathroom
- Soft or spongy floor near the tub
- A musty smell in the bathroom that returns after cleaning
- Visible water running down the outside of the drain pipe during a fill
If you see any of these signs, a stopper replacement will not solve the problem. The drain flange seal (typically plumber’s putty or silicone between the drain flange and the tub floor) may need to be reset. If the overflow plate gasket was disturbed in a previous repair, that needs to be reseated or replaced too. Both repairs involve opening more of the tub’s plumbing than a stopper swap.
For any tub fixture issue that extends beyond the stopper mechanism, our faucets and fixtures service page covers what we diagnose and repair.
If there is any doubt about where the leak originates, call a plumber before opening more of the wall. A diagnostic visit costs far less than the subfloor or framing repair a slow hidden leak eventually requires.
What Minnesota Homeowners Should Know About Permits
Replacing just the stopper mechanism on a homesteaded single-family home in Minnesota typically requires no plumbing contractor license and likely no permit. Under the 2020 Minnesota Plumbing Code, an owner-occupant of a homesteaded single-family residence may perform plumbing work without holding a contractor’s license. Replacing internal working components - the stopper mechanism only, with no drain body disturbance - likely falls under the permit-exempt category per the MN Department of Labor and Industry Plumbing Code FAQ.
The line shifts when the work grows. Remove the drain body, disturb the overflow tube connection, or open a wall to address a pipe, and check with your city’s building department first. Different municipalities in the metro apply the permit threshold slightly differently. A five-minute call to the building department removes the question before work starts. The licensing exemption covers the homeowner’s right to do the work. It does not exempt the work from permit requirements for anything regulated under the code.
When to Stop and Call a Plumber
Most stopper replacements stay within the DIY range. These situations call for a professional instead:
- The brass post or set screw is frozen solid after penetrating oil and will not respond to steady force.
- The set screw head is stripped and the stopper body is stuck.
- You find evidence of a leak below the tub, not just surface seeping at the stopper.
- The drain crossbar or drain body threads are visibly damaged.
- A replacement post will not thread cleanly after the first few turns.
- The overflow plate gasket is torn and needs to be replaced without risking further wall damage.
- The tub is old enough that you are not certain of the drain body material or thread specification.
Older Twin Cities homes, particularly those built before 1970, can have cast iron drain assemblies corroded together over decades. Forcing a corroded assembly risks cracking parts behind a finished wall. That repair is significantly larger than a stopper swap.
For slow drains elsewhere in the house, the problem likely has nothing to do with the stopper. Our drain clearing service handles what we find when drains slow for reasons that go deeper than the stopper mechanism. If the spout diverter in the same tub is also giving you trouble, the guide on bathtub spout diverter problems covers that repair.
Sometimes what begins as a stopper call surfaces plumbing that has not been touched in decades. That is the right moment to ask about the broader condition of the drain system. Some homeowners find they eventually need more significant work, including sewer repairs that avoid digging up the yard.
Northern Benjamin Franklin Plumbing is locally owned and operated in the Twin Cities. Our On-Time Guarantee(R) backs every appointment: we arrive in the window we schedule, or we pay you $5 for every minute we are late, up to $300. “If there is any delay, it’s you we pay!” For any bathtub drain stopper replacement that goes beyond the DIY range, call (763) 296-1844 or book online.
Frequently Asked Questions
How much does it cost to replace a worn bathtub drain stopper? +
Need a technician now?