
Outdoor Faucet Leaking After Winter? Check Inside the Wall
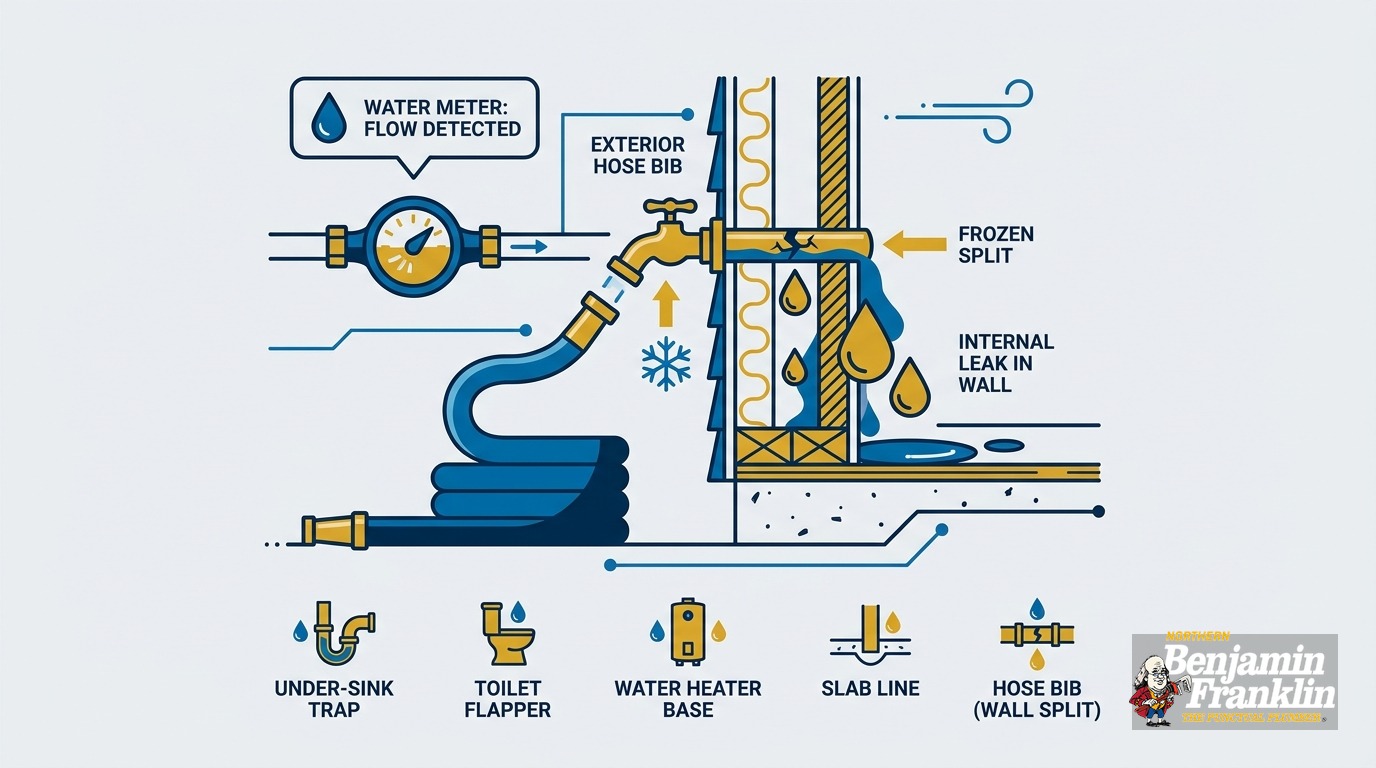
Key Takeaways
- An outdoor faucet leaking after winter usually means the pipe split inside the wall, not at the spout. The exterior can look completely dry.
- Frost-free sillcocks keep their shutoff valve 8-12 inches inside the heated wall. They drain by gravity when the valve closes. A garden hose left attached seals the spout and prevents that drain.
- Water trapped in the standpipe freezes on a hard January night, expands, and splits the pipe at the far end, inside the wall cavity.
- The spring test catches this before water soaks framing and insulation: turn on the outdoor valve, then immediately check the area directly behind the faucet from the basement or crawlspace.
- Minnesota Plumbing Code §603.5.7 mandates frost-free hose bibbs on all outdoor faucets. Replacing a non-compliant fixture requires a permit and a licensed plumber.
- The single most important fall prevention step: disconnect your garden hose before the first hard freeze.
Why Does an Outdoor Faucet Leak After Winter?
Most outdoor faucet problems after a Minnesota winter begin in October, not April. The freeze happens months before the leak appears. A hose left connected in the fall traps water in the wrong place. That water freezes, splits a pipe inside the wall, and sits undiscovered until you turn on outdoor water in spring.
The confusion starts with the symptom. You turn on the outdoor faucet in April. The spout looks fine. No visible drip, no crack at the handle, normal water flow at first glance. You assume the plumbing made it through winter intact. But somewhere behind the siding, inside the wall cavity, water is escaping.
This is the defining feature of outdoor faucet damage after a cold Minnesota winter. The failure is internal. The exterior spout is not where the pipe splits. It is not even close to where the pipe splits. Understanding why starts with how frost-free sillcocks are designed, and what happens when that design is defeated by a hose that stayed on one week too long.
The damage is also cumulative. A cracked standpipe running undetected from April through June soaks insulation, softens framing, and creates the temperature and humidity conditions that allow mold to establish. What begins as a plumbing repair becomes a plumbing, insulation, and remediation repair. Running the spring test early is how you catch it while it is still just a plumbing repair.
How Does a Frost-Free Sillcock Actually Work?
A frost-free sillcock keeps all the water behind the heated wall. The handle operates a long rod that runs 8-12 inches through the wall and controls a valve at the warm interior end. When you close the handle, that interior valve shuts. Water remaining in the standpipe drains out by gravity through the open spout, leaving nothing in the cold zone to freeze.
When the design works, the standpipe contains no standing water during a freeze. There is nothing in the cold section of the wall to expand and crack.
IRC 2024 §P2603.5 requires frost-proof sillcocks to pitch downward toward the exterior so the standpipe drains fully when the valve is closed. A sillcock installed level or tilted slightly upward, a common installation error, traps a small amount of water in the standpipe even when no hose is attached. That standing water is enough to cause a split in a single-digit freeze.
The system only works when water can exit freely at the spout. A connected garden hose removes that option entirely.
What Happens When You Leave a Garden Hose Connected?
A connected garden hose seals the end of the spout. That seal prevents the standpipe from draining when you close the handle. Water stays in the standpipe, freezes during a hard cold snap, and splits the pipe from the inside.
This is the most common cause of outdoor faucet damage after a Minnesota winter, and it is entirely preventable.
Here is the mechanism. When you close the handle, water in the standpipe needs to exit through the open spout and drip onto the ground. That exit requires a slight pressure differential at the far end. A garden hose attached to the spout, even if the hose-end nozzle is open, seals that exit. The standpipe cannot drain.
This is true even when the hose nozzle is in the open position. The hose itself holds a column of water at the connection point. The vacuum relief that allows gravity drainage never forms. Water sits in the standpipe through October, November, and into December.
Twin Cities ground freezes to 5 feet minimum under Minnesota Administrative Rules. The wall cavity does not freeze to that depth, but on a single-digit night in January, the standpipe temperature drops far enough. Water expands roughly 9% when it freezes. A rigid copper or PEX standpipe has no room to give. The pipe splits, almost always at the far end near the interior shutoff fitting or at a joint, well inside the wall cavity.
The exterior of your house looks unchanged. Inside the wall, you have a fractured pipe that will leak the moment water pressure returns in spring.
Why Does the Leak Show Up Inside the Wall, Not at the Spout?
The crack is at the wrong end of the standpipe to be visible from outside. When you restore water in spring, pressure pushes water through the interior valve and out the split, into the wall cavity. The exterior spout may look and run completely normally.
This is what makes outdoor faucet damage after winter so easy to miss for weeks or months.
You turn on the outdoor faucet in April. Water flows. There may be no pressure drop you can detect at the spout. You move on to the next item on your spring checklist. Behind the siding, water is soaking fiberglass batt insulation. It runs down framing. It pools on the top plate of the wall below and eventually shows up as a brown stain on a basement ceiling or a soft spot near an exterior corner.
By then, the wall has likely been wet for weeks. Mold can establish in 24-48 hours under the right temperature and humidity conditions. Spring humidity in Minnesota supplies those conditions readily.
The EPA estimates that the average household wastes 9,400 gallons of water per year from leaks. A cracked standpipe running continuously from April into summer adds significantly to that figure, in addition to the structural damage it causes with every passing week.
The spring test exists specifically to catch the leak before it spreads beyond the plumbing.
How Do You Run the Spring Test?
Turn on the outdoor faucet and walk immediately to the basement or crawlspace to check the framing directly behind it. You are looking for active moisture forming in real time: drips from framing or fittings, wet insulation that was dry a moment ago, or a water stain appearing on ceiling material. You have about 30-60 seconds to observe before enough water has escaped to matter.
Here is the test, step by step.
Before you turn anything on:
- Locate the outdoor faucet on the exterior wall.
- Go inside and find the area of the basement ceiling or crawlspace wall directly behind that faucet.
- Note the current condition: dry insulation, clean framing, no stains. This is your baseline.
The test:
- Go outside and turn the outdoor faucet handle to the fully open position.
- Walk quickly back inside and down to the basement or crawlspace.
- Stand in the area directly behind the faucet location.
- Watch for 30-60 seconds.
What you are looking for:
- Active drips from a joint, fitting, or pipe section
- Wet spots appearing on insulation that was dry when you checked moments before
- A water stain forming or darkening on ceiling or wall material
- Any visible moisture on framing members
If everything stays dry after a minute, the standpipe likely held through the winter. If you see moisture forming, shut off the outdoor faucet immediately and call a plumber. Note exactly where the moisture is appearing. That information helps the plumber locate the split before opening the wall.
Run this test the first time you restore outdoor water each spring, before you connect a hose or use the faucet for anything else. The EPA designates Fix a Leak Week each March and lists outdoor hose bibbs as one of the primary leak check points. In Minnesota, where standpipes endure a harder freeze than neighbors in Iowa or Illinois, this check is not optional. It is the earliest chance you have to contain the damage.
Does Minnesota Require a Frost-Free Hose Bibb?
Yes, and the requirement is mandatory. Minnesota Plumbing Code §603.5.7 requires self-draining frost-free hose bibbs with an integral backflow preventer on all outdoor faucets. The statutory language uses “shall,” which means required, not a best practice or a recommendation.
The code has been in effect since 2015, with active enforcement beginning around 2020. If your outdoor faucets were replaced after 2020, they should be frost-free and include backflow prevention. If they predate 2015, or if they were installed during the code gap between 2015 and 2020, they may not comply.
The backflow preventer is a separate requirement from the frost-free design. It stops outdoor water, which may have contacted soil, fertilizer, or garden chemicals, from being drawn back into the home’s supply lines under a pressure drop. Both features are required on any new installation.
When a plumber replaces an outdoor faucet, the correct frost-free fixture with the proper stem length for your wall thickness is not always stocked at local home improvement retailers. Frost-free models built for Minnesota’s code requirements, particularly those sized for the 2x6 wall construction common in walkout basements, are often sourced through a plumbing supply house. A licensed plumber handles sourcing the correct fixture as part of the permit and replacement process.
Pulling the permit also means a licensed inspector verifies the installation: correct pitch, correct backflow preventer, correct fixture for the wall depth. Without an inspection, there is no verification the new sillcock will drain correctly - and a sillcock that does not drain correctly is on track for the same failure next winter.
What About Homes Built Between 2015 and 2020?
This is a window worth knowing about. Minnesota adopted the frost-free requirement in 2015. Enforcement gaps in the years immediately following meant that new construction could still pass inspection with a standard non-frost-free sillcock in some jurisdictions, particularly on walkout basement exterior walls where the sillcock detail is less visible during a framing or rough inspection.
If your home was built in that range and the outdoor faucets have never been replaced, you may have non-compliant fixtures installed by the original builder and signed off by an inspector who did not flag them.
This creates two layers of risk.
First, a standard sillcock has its shutoff valve at the exterior, in the freeze zone. The valve mechanism itself is exposed to temperatures that a frost-free design routes into the heated wall. Hard freeze events hit the Twin Cities several times each winter. A standard valve can be damaged by the cold directly, without any hose attached.
Second, any repair or replacement now must use a compliant frost-free fixture. Swapping one non-compliant sillcock for another does not satisfy the current code, regardless of what was originally permitted.
If your home falls in this construction window, ask the plumber to verify what you have before ordering parts. The difference between a compliant and a non-compliant fixture affects the scope of the repair, the permit classification, and whether a future home inspection will flag unpermitted or out-of-code work at the outdoor faucet locations.
Our post on hidden plumbing damage after a Minnesota winter covers the broader pattern of winter damage that newer homes in this construction era tend to show once spring weather arrives.
Can You Fix a Cracked Standpipe Yourself?
No, not legally in Minnesota. Replacing a through-wall standpipe requires cutting into the wall, fitting and securing the new standpipe, and pulling a permit under the Minnesota State Plumbing Code. A licensed plumber pulls the permit. DIY replacement is a code violation that will show up as an unpermitted repair on a future home inspection.
This comes up because the exterior view of a hose bibb looks simple: a threaded spout and a handle. The repair is not simple. It involves the standpipe inside the wall and the shutoff fitting at the conditioned-space end, neither of which is accessible without opening the wall.
In most cases the job also includes:
- Cutting through interior drywall or sheathing to access the standpipe
- Removing and replacing insulation in the wall cavity
- Verifying the new sillcock is pitched correctly toward the exterior for proper drainage
- Installing the required backflow preventer
- Restoring the wall opening with appropriate fire-blocking where required
- Scheduling a permit inspection before the wall is closed
A cracked standpipe that ran through a spring season before it was found also typically means wet or mold-compromised insulation and potentially soft framing. That needs to be assessed and dried before the wall is closed back up. Closing over wet framing creates conditions for continued mold growth behind finished surfaces.
Our burst and frozen pipe repair service page covers what the assessment and repair process looks like, from the initial inspection through permit closeout.
How to Prevent This Next Fall
The spring test is how you find a problem that already happened. Fall prevention is how you avoid it entirely. The steps are straightforward.
Disconnect your garden hose before the first hard freeze. In the Twin Cities, the average first freeze falls around October 21. Sustained temperatures well below freezing follow shortly after. Most plumbers recommend treating mid-October as a firm deadline, not a guideline. Do not wait for the first frost forecast before disconnecting.
Additional steps that reduce your risk:
- If your sillcock has an interior shutoff valve, close it before winter. Leave the exterior handle in the open position after the interior valve is closed, so any water remaining in the standpipe has a clear path to drain completely.
- Confirm the sillcock pitches downward toward the exterior. A level or upward-pitched installation will not drain properly, even with no hose attached.
- Inspect the sillcock for dripping or stiffness before you close it for the season. A sillcock that already drips or is difficult to turn may not seat completely, leaving the standpipe partially pressurized through winter.
- Replace any non-frost-free fixture before the next freeze season. A compliant frost-free sillcock is a permanent fix. It is not a seasonal workaround.
Our complete winterizing guide for Twin Cities homeowners walks through the full fall plumbing checklist in sequence, including outdoor faucet steps, pipe insulation in unconditioned spaces, water heater checks, and shutoff valve testing.
Run the spring test every year, the first time outdoor water is restored, before the hose goes back on. It takes two minutes. The repair it prevents takes days and costs significantly more.
Ready to Fix It?
If the spring test found moisture, if water pressure at the outdoor spout dropped after you opened it, or if a stain appeared on a ceiling or wall near an exterior faucet, do not wait. A cracked standpipe running through a Minnesota spring causes more damage per week than the standpipe repair costs on day one.
Northern Benjamin Franklin Plumbing is locally owned and operated in the Twin Cities. We serve Minneapolis, St. Paul, Blaine, Bloomington, Brooklyn Park, Coon Rapids, Maple Grove, and the surrounding metro. Our On-Time Guarantee(R) means we arrive in the window you schedule. If there is any delay, it’s you we pay!
We handle hose bibb replacement, cracked standpipe repair, wall access and damage assessment, and full permit coordination. Our faucets and fixtures service covers outdoor faucet repair and replacement from the initial inspection through permit closeout.
Call (763) 296-1844 or book online. Run the spring test today, before you connect a hose for the season.
Frequently Asked Questions
Why is my outdoor faucet leaking after winter but the spout looks dry? +
Can I replace a frost-free hose bibb myself in Minnesota? +
How do I prevent my outdoor faucet from freezing next winter? +
When should I call a plumber for an outdoor faucet problem after winter? +
Need a technician now?